

 Rapid Ext JS (beta)


Ext JS 4.1 Performance
July 3, 2012
116 Views
In this article, we will review several factors that affect performance of an Ext JS application.
- Network latency which affects initial startup time heavily, but also data store load time.
- CSS processing.
- JavaScript execution.
- DOM manipulation.
Network Latency
To minimize application startup time, you need to bear in mind that browsers impose a limit on the number of concurrent network connections to any one domain.
This means that if many files are requested from one domain, once this quota is used, subsequent downloads will be queued, and they will be processed only when a connection slot becomes free. Newer browsers have higher limits, but this makes optimization all the more important in older, slower browsers.
The solution is to use the Sencha SDK tools to build a single, concatenated JavaScript file containing all the required JavaScript used by the application.
See Getting Started with Ext JS 4.0 for details.
The SDK “create” command analyzes the application by loading the page, loading all files referenced by all “requires” and “uses” properties of class definitions. It then creates a single JavaScript file containing all required class definitions in the correct order.
See the Ext JS 4.1 Docs for details about the Sencha class system.
Another method for minimizing network latency is enabling GZIP compression in the web server which serves the Ext JS page and its associated JavaScript and CSS.
CSS Processing
CSS selectors are matched right to left, following the DOM’s parentNode pointer.
This means that a selector like
.HeaderContainer .nav span
will be processed, and an attempt made to match it on every span in the document. The parentNode axis will be followed to try to find ancestor nodes with the two specified classes.
It’s much more efficient to use a single, identifying class name on elements to be styled.
JavaScript Execution
There are several points to bear in mind when optimizing performance of JavaScript code:
- Avoid older or badly written JavaScript engines.
- Optimize code which is repeated frequently.
- Optimize code which is executed at render or layout time.
- Better still, try not to execute any extra code at initial render or layout time.
- Move invariant expressions outside of loops
- Use for (…) rather than Ext.Array.each
- If a function performs its task conditionally and is frequently called, check the condition outside the call, and only call it if necessary. (See calls to fireEvent in Ext JS codebase)
- Setup and teardown of a call frame (apparatus needed to make a function call) is slow on bad JavaScript engines
Code optimization example
Imagine a statistical application which offers to perform operations on numerical grid columns. We can add items to the grid’s header column menu which perform the required operation upon whichever column they are invoked.
The handler must interrogate its context and operate on the currently active header:
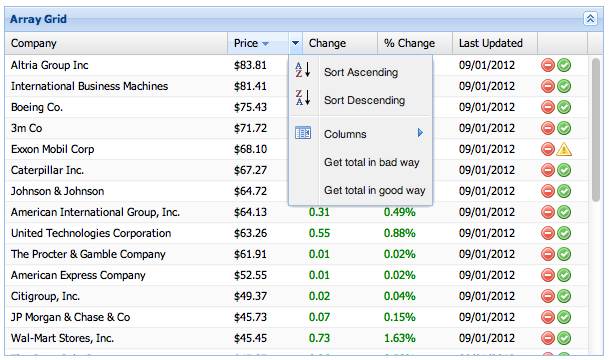
The example at GitHub illustrates two ways of performing this operation. It will run in any of the SDK’s examples directories.
A first attempt at writing a function which totals the currently active column might look like this:
var r = store.getRange(),
total = 0;
Ext.Array.each(r, function(rec) {
total += rec.get(menuItem.up(‘dataIndex’).dataIndex);
});
}
There are a couple of things wrong with this approach. Firstly, the use of Ext.each invokes the passed function for every record in the array. As we have seen, function setup can affect performance. Also, the result of the menuItem.up('dataIndex') expression is invariant, and should only be executed once, outside the loop.
So the optimum implementation would be:
var r = store.getRange(),
field = menuItem.up(‘dataIndex’).dataIndex;
total = 0;
for (var j = 0, l = r.length; j < l; j++) { total += r[j].get(field); } }
This may seem a trivial difference, but the performance difference is significant.
In the table below, the calculation function was iterated 10000 times to provide a measurable time:
| Browser | Bad | Good |
|---|---|---|
| Chrome | 1700ms | 10ms |
| IE9 | 18000ms | 500ms |
| IE6 | Gave up | 532ms |
As you can see, even without iteration, IE9 would have taken 1.8 milliseconds to perform a single operation using the suboptimal implementation.
Use Page Analyzer to measure performance
Page Analyzer is an example under the SDK’s example/page-analyzer directory. It runs a page from the same domain in a captive iframe, and instruments the captive Ext JS instance, so it can analyze layout performance and the performance of any method of any object.
If you’re using Chrome, start it from the command line using the –enable-benchmarking switch to enable microsecond timing accuracy.
To analyze the performance critical areas in the above example, switch to the “Performance” tab, and then in the lower left TabPanel, the “Accumulators” tab. Paste the following into the textarea:
“Component.up”: {
“Ext.Component”: “up”
},
“CQ.is”: {
“Ext.ComponentQuery”: “!is”
}
}
Ensure that the 10000 times iteration is commented out in the two total calculation functions, so you get accurate performance state.
Then load the grid performance example in the Page Analyzer, request the total using “Get total in bad way”, and click the Page Analyzer’s “Update Stats” button at the top right.
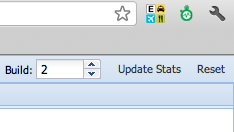
Then click “Reset” to zero the accumulators, increment the “Build” counter, and request the total using “Get total in good way” and click the Page Analyzer’s “Update Stats” button.
In the “Grid” subtab of the “Performance” tab, you can then see the results of the two runs like this:
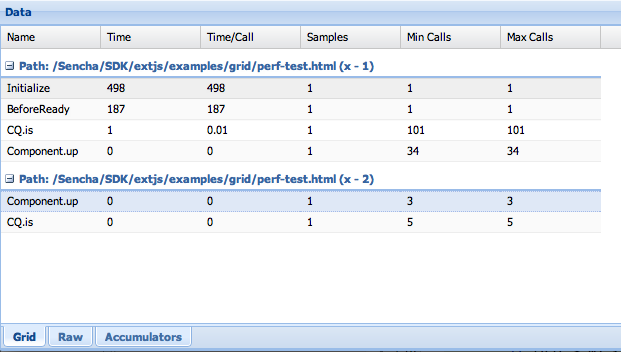
You can see that the hoisting of the ComponentQuery invariant expression out of the loop resulted in far fewer calls to the ComponentQuery methods.
Coalesce multiple layouts
Ext JS 4 performs an automatic layout run upon content change or size change. This means that an update of a Button’s text can cause a layout of the owning Toolbar (because the Button’s height may change); and then the toolbar’s owning Panel must be layed out (because the Toolbar’s height may change)
Because of this fact, it’s important to coalesce multiple layouts caused by several content or size changes into one run. The way we do this is as follows:
Ext.suspendLayouts();
// batch of updates
Ext.resumeLayouts(true);
}
The true parameter passed means that as well as re-enabling layouts, it flushes any queued up layout requirements to run at that point.
Reduce DOM burden
It’s important to reduce container/component nesting to as shallow a level as possible to avoid redundant layout runs and DOM reflows. These can be expensive.
Also, the principle to follow is to use the simplest Container or Layout which will do the required job.
A common example of over-nested components occurs when someone wants to put a Grid into a TabPanel. A naive implementor might use the following construct:
xtype: “tabpanel”,
items: [{
title: “Results”,
items: {
xtype: “grid”
…
}
}] }
What that does is adds an ordinary Panel to the TabPanel as one of its child items. That Panel then contains a Grid. So that’s one extra layer of nesting which is doing nothing.
In fact, it’s breaking the operation of the TabPanel because that wrapping Panel has not been configured with a layout, so it does not perform any sizing on its child Grid, which means it will not adapt to the TabPabel’s size, and scroll within the TabPanel’s height.
The correct way to do this is as follows:
xtype: “tabpanel”,
items: [{
title: “Results”,
xtype: “grid”,
…
}] }
Why is this principle important?
It’s important to try to keep the component tree (and therefore the DOM tree) as light as possible because, in Ext JS 4, more components are Containers that have child items, and they run their own layout managers. For example, a Panel’s Header is now a first class Container, and it may be configured with extra items that will appear in addition to the title text and any tools.
This is an overhead, but it offers much flexibility in terms of UI design to have a Header as an addressable Container within the hierarchy.
Also, in Ext JS 4, Components use Component Layout Managers to manage the size and position of their internal DOM structure instead of shoehorning all that processing into an onResize method as in Ext JS 3.x.
Visualize the component tree
When designing a UI, and thinking about the above principles, try to envision the UI as a tree structure. For example, a Viewport could be envisioned like this:

In order to render a component tree, it is walked twice.
In the first pass, beforeRender is called upon each component, and then getRenderTree yields a DomHelper config object which is converted to HTML markup and then added into the render buffer.
After the first pass, the HTML representing the whole tree is inserted into the document in one operation. This reduces the DOM processing involved in creating the application’s structure.
Then the tree is walked again. onRender is called which links up each Component with its associated DOM node. Then afterRender is called to finish the rendering process.
After this, an initial full layout is performed.
This is why creating the lightest UI design is important!
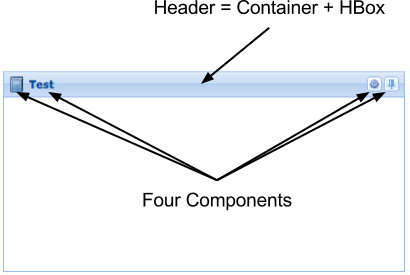
Consider the following Panel specification:
width: 400, height: 200,
icon: ‘../shared/icons/fam/book.png’,
title: ‘Test’,
tools: [{
type: ‘gear’
}, {
type: ‘pin’
}],
renderTo: document.body
});
It still results in a fairly complex UI structure:
Avoid shrinkwrapping (auto sizing based on content) where possible.
Although Ext JS 4 offers the possibility of sizing Containers to fit around content (referred to in Ext JS as “shrinkwrapping”), this does impose the burden of running partial layouts, followed by a browser reflow to allow measurement of results, followed by a subsequent layout using the measured height or width.
Avoiding the need for a flush of calculated sizes to the DOM to allow measurement, will improve performance.
Avoid size constraints (minHeight, maxHeight, minWidth, maxWidth) where possible.
If these constraints are hit, then the entire layout has to be recalculated. If, for example, a flexed child of a box layout receives a calculated width less than its configured minWidth, it will switch from being flexed to being fixed at its minWidth, and the entire box layout will have to be recalculated.
A similar effect occurs when a box layout’s stretchMax configuration is used. All child Components switch to having a fixed perpendicular dimension (eg, height for an HBox layout), and the layout is recalculated.
Avoid postprocessing DOM of Component in afterRender
To avoid DOM reflows and repaints, try not to postprocess the DOM structure of a Component after it is rendered. Instead, use provided hooks to modify the configuration of the Component before its HTML is generated.
If it is important to change the DOM structure, then getRenderTree would be the best method to override.
Grid performance
Table size affects performance, especially column count. Keep the number of columns down, where possible.
If the dataset is very large, and the UI precludes use of a PagingToolbar, use buffered rendering commonly known as an “infinite grid”.
To implement this, all that is necessary is to configure your store with:
pageSize: 50, // Whatever works best given your network/DB latency
autoLoad: true
And continue to load and manipulate it as usual.
How it works
The grid now calculates how large the rendered table should be using the configuration of the PagingScroller which is the object that monitors scroll position. These configurations are as follows when scrolling downwards:
- trailingBufferZone The number of records to keep rendered above the visible area.
- leadingBufferZone The number of records to keep rendered below the visible area.
- numFromEdge How close the edge of the table should come to the visible area before the table is refreshed further down.
The rendered table needs to contain enough rows to fill the height of the view plus the trailing buffer size plus leading buffer size plus (numFromEdge * 2) to create some scrollable overflow.
As the resulting table scrolls, it is monitored, and when the end of the table comes within numFromEdge rows of coming into view, the table is re-rendered using a block of data further down in the dataset. It is then positioned, so the visual position of the rows does not change.
In the best case scenario, the rows required for that re-rendering are already available in the page cache, and this operation is instantaneous and visually undetectable.
To configure these values, configure your grid with a verticalScroller:
xtype: ‘gridpanel’,
verticalScroller: {
numFromEdge: 5,
trailingBufferZone: 10,
leadingBufferZone: 20
}
}
This will mean that there will be 40 rows overflowing the visible area of the grid to provide smooth scrolling, and that the re-rendering will kick in as soon as the edge of the table is within 5 rows of being visible.
Keeping the pipeline full
Keeping the page cache primed to be ready with data for future scrolling is the job of the Store. The Store also has a trailingBufferZone and a leadingBufferZone.
Whenever rows are requested for a table re-render, after returning the requested rows, the Store then ensures that the range encompassed by those two zones around that requested data is in the cache by requesting them from the server if they are not already in the cache.
Those two zones have quite a large default value, but the developer can tune them to keep fewer or more pages in the pipeline.
Cache Misses
When “teleporting” way down into the dataset to a part for which there are definitely no cached pages, there will be a load mask and a delay because data will need to be requested from the server. However this case has been optimized too.
The page which contains the range required to create the visible area is requested first, and the table will be re-rendered as soon as it arrives. The surrounding pages covering the trailingBufferZone and leadingBufferZone are requested after the data that is really needed immediately by the UI.
Pruning the cache
By default, the cache has a calculated maximum size, beyond which, it will discard the Least Recently Used pages. This size is the number of pages spanned by the scroller’s leadingBufferZone plus visible size plus trailingBufferZone plus the Store’s configured purgePageCount. Increasing the purgePageCount means that once a page has been accessed, you are much more likely to be able to return to it quickly without triggering a server request later.
A purgePageCount value of zero means that the cache may grow without being pruned, and it may eventually grow to contain the whole dataset. This might actually be a very useful option when the dataset is not ridiculously large. Remember that humans cannot comprehend too much data, so multiple thousand row grids are not actually that useful – that probably means that they just got their filter conditions wrong and will need to re-query.
Pull the whole dataset client side!
One option if the dataset is not astronomical is to cache the entire dataset in the page map.
You can experiment with this option in the “Infinite Grid Tuner” which is in your SDK examples directory under examples/grid/infinite-scroll-grid-tuner.html.
If you set the “Store leadingBufferZone” to 50,000 and the purgePageCount to zero, this will have the desired effect.
The leadingBufferZone determines how far ahead the Store tries to keep the pipeline full. 50,000 means keep it very full!
A purgePageCount of zero means that the page map may grow without limit.
So when you then kick off the “Reload”, you can see the first, visually needed page being requested, and then rendered.
Then, you can see the Store diligently trying to fulfill that huge leadingBufferZone. Pretty soon, the whole dataset will be cached, and data access anywhere in the scrollable area will be instant.
What's your reaction?
 0
0

 0
0

Latest Content

Discover the Top 07 Architecture Patterns used in Modern Enterprise Software Development
Developing software without an architecture pattern may have been an option back then. However, that’s…
April 11, 2024

JavaScript Design Patterns: A Hands-On Guide with Real-world Examples
As a web developer, you know how popular JavaScript is in the web app development…
March 26, 2024

Virtual JS Days 2024のハイライト
2024年2月20日~22日、第3回目となる「Virtual JavaScript Days」が開催されました。JavaScript の幅広いトピックを採り上げた数多くのセッションを実施。その内容は、Senchaの最新製品、ReExt、Rapid Ext JSまで多岐にわたり、JavaScriptの最新のサンプルも含まれます。 このカンファレンスでは多くのトピックをカバーしています。Senchaでセールスエンジニアを務めるMarc Gusmano氏は、注目すべきセッションを主催しました。Marc は Sencha の最新製品「ReExt」について、詳細なプレゼンテーションを実施。その機能とメリットを、参加者に理解してもらうべく詳細に説明しました。 カンファレンスは、Senchaのジェネラルマネージャを務めるStephen Strake氏によるキーノートでスタートしました。キーノートでは、会社の将来のビジョンについての洞察を共有しています。世界中から JavaScript 開発者、エンジニア、愛好家が集まるとてもエキサイティングなイベントとなりました。これは、JavaScript…
March 25, 2024


