

 Rapid Ext JS (beta)


Using URL Schemes with Sencha Touch, iOS, and Cordova
April 22, 2015
164 Views
Enabling your mobile apps to launch other apps on the same device is convenient and enhances the user experience. A URL scheme is a mechanism that provides an app the ability to launch or resume another app. But the true power of a URL scheme is unleashed when you use it to pass data into the receiving app, thereby altering the apps behavior or directing the user to a specific location within the app.
So when might you want to implement a URL Scheme within your mobile app? Here are some common use cases:
- Launching or resuming an app from another app
- Sending data to an app
- Transferring stored data from a “lite” version to a paid version of an app
In today’s post, I’m going to cover launching an app and sending it specific data from a URL.
Helping Users
CNX has a mobile portal app that provides end users access to all sorts of enterprise data while they’re on-the-go, but it must be configured with appropriate server connection details (IP/port/etc.) in order to function properly. In the original incarnation of this app, an administrator would direct users to download the app to their phone or tablet and then have them tap on a “Connections” icon to enter all the pertinent information. We quickly learned that getting users to tap in this information correctly was a bit problematic.
The solution was to give the administrators a way to send an email to new users with a special URL that, when tapped on a mobile device, would automatically launch or switch to the app and configure it with the proper connection details. This process avoided typos during setup, thereby making the users’ initial experience with the app much more positive.
Now, let’s go over the steps for setting up the application to handle this kind of URL scheme, in which one app (in this case, whatever email client is running on the user’s device) launches another app and sends it some specific data.
iOS Setup
The first step is to update the application’s -info.plist file with our custom URL. Below is an example of what the *-info.plist would look like after adding a custom URL scheme of “urlschemeexample” in xcode.
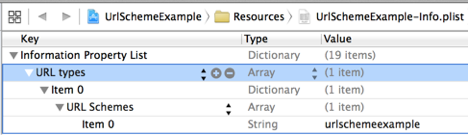
An example URL to launch the application would be: urlschemeexample://?foo=bar
If your end goal is simply to launch or resume the application, ignoring any query parameters, then this is the only required step. However, in our case, we want the app to consume data passed in through the URL’s query string, so we need to continue to the next step.
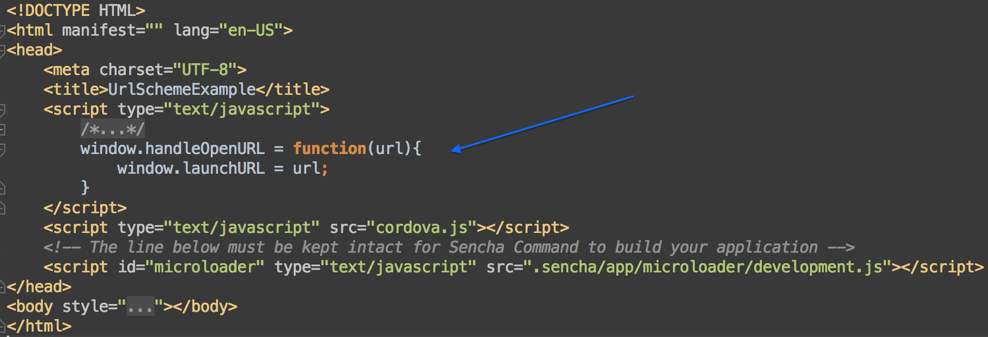
index.js
Cordova will call a global function named handleOpenURL if it exists. This function is passed one parameter: a string containing the full URL that was used to launch/resume the application. Given this process, we are going to add the handleOpenURL method in our Sencha Touch index.js file. Within it, we set a new property on the window called ‘launchURL’ which will hold the value of the full URL that was used to launch the application. This way we can access it once our Sencha Touch app is initializing.
Controller
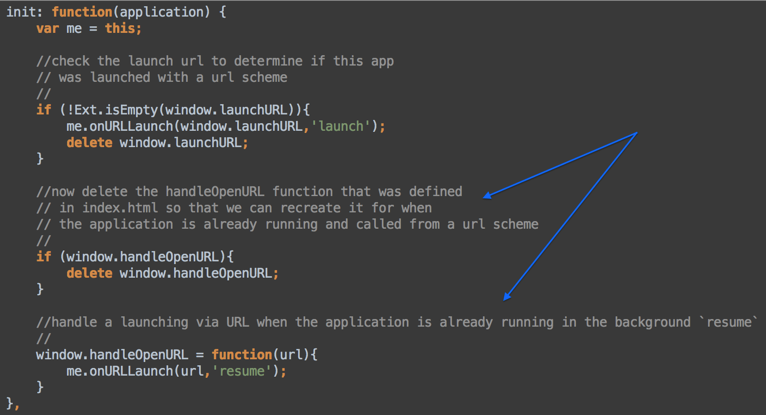
We will use the controller’s init method to check if the application was launched by our URL scheme. If the ‘launchURL’ property on the window exists, then we know the application was launched from the URL. In such cases, the controller will call a method called ‘onURLLaunch’ (this is a method we will code within the controller later).

Only a couple more steps left. Continuing within the “init” method of our controller, delete the original handleOpenURL method (as this has already served its purpose when Cordova automatically called it upon launch). We are now going to repurpose this method for app resume functionality — meaning, switching the user over to an already launched app.
onURLLaunch Method
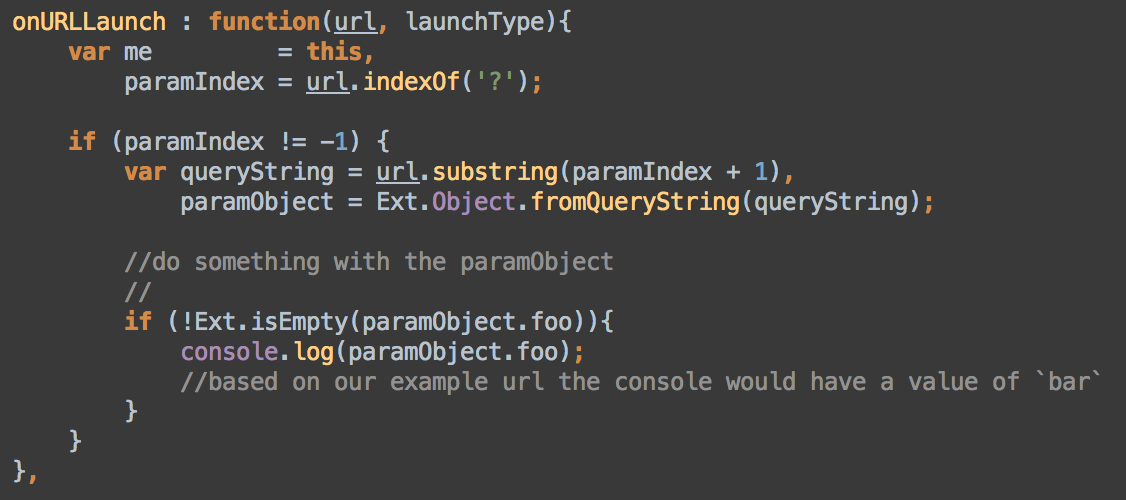
This method is called from our controller’s init method on both the launch and resume of our app. It takes two parameters, the first being the full URL and the second being the launch type (“launch” or “resume”). This makes it possible for your app to behave differently on a resume versus a launch, if such functionality is needed.
The final step is to extract the query string and use Ext.Object.fromQueryString to convert the query string into an object that the app can then use to perform any special actions needed.
We’re Done
And there you have it! As you can see, the URL scheme makes it possible to send all kinds of information from one app to another. All you need to do now is think of some good use cases where you can save your users from having to enter or re-enter data into an app.
What's your reaction?
 0
0

 0
0

Latest Content

Ext JS Performance Optimization for Large-scale Applications
Are you facing issues with Ext JS applications’ performance as they scale up? Don’t worry!…
April 23, 2024
Ext JS Dynamic Forms: Hands-On Guide to Create Data Forms
Dynamic forms are changing the online world these days. ExtJS can help you integrate such…
April 23, 2024

How to Write Unit Tests with Sencha Test
In modern software development, unit testing has become an essential practice to ensure the quality…
April 22, 2024


