

 Rapid Ext JS (beta)


Developing Mobile Applications with Force.com and Sencha Touch – Part 3
May 9, 2013
107 Views
Overview
In Part 1 and Part 2 of our series on Developing Mobile Applications with Force.com and Sencha Touch, we built out a simple mobile application hosted in a Salesforce.com Visualforce page to display a list of Leads, and allowing add, edit and delete capability using an Apex controller.
In this third part of the series, we want to highlight the enterprise data capability of Sencha Touch, so we’ll focus on how the framework allows us to work with large datasets by adding paging and search capability to the PocketCRM application.
Along the way, we’ll show you how well the Sencha data proxy works in conjunction with querying data in Apex using SOQL and its OFFSET paging feature, and we’ll leverage the concept of Sencha plugins for component reusability and extensibility.
Here’s what we’ll accomplish in part three of the tutorial:
- Add ‘scroll down’ paging to automatically fetch the next ‘n’ records when a user scrolls to the bottom of a list.
- Redesign the query capability of our Apex controller class to provide efficient data paging using SOQL OFFSET and a search filter.
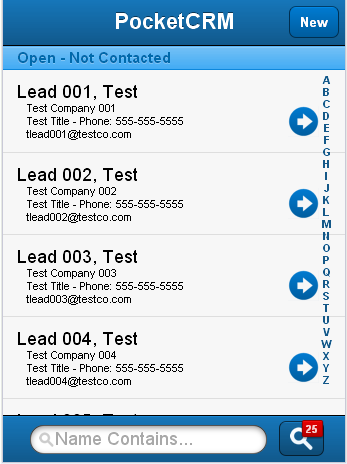
- Add a Search Field in the list view, allowing a user to filter records fetched from Salesforce by a search on any portion of a Lead’s first or last name.
- Display a count of how many records are currently contained in the list, and include listeners to properly refresh the count whenever the list changes.
So let’s get started.
Let’s Dig Back In
What differentiates Sencha Touch from other JavaScript libraries and frameworks is how well it supports large and complex mobile applications. This makes it a great fit for mobile in the enterprise, where there are typically more stringent requirements regarding identity, security, business rules, and of course large volumes of data. As such, it’s perfect for building mobile apps to extend Salesforce.com CRM functionality, or Force.com custom enterprise applications. In addition, as we’ve already seen, it is easily hosted in Visualforce. We’ll pick up where we left off, to introduce the concept of list paging and search in Sencha Touch
It’s a given that any effective enterprise mobile application must provide the capability to manage large sets of records for any data entity that a user has access to. Our Salesforce.com implementation could store thousands or even tens of thousands of Leads, and there’s no telling just how many records our application will need to serve up for any particular user, as different users have different sharing rights on the data. Therefore, we must provide a user experience that makes it easy and fast for any user to find and browse a reasonable number of Leads for which they have access.
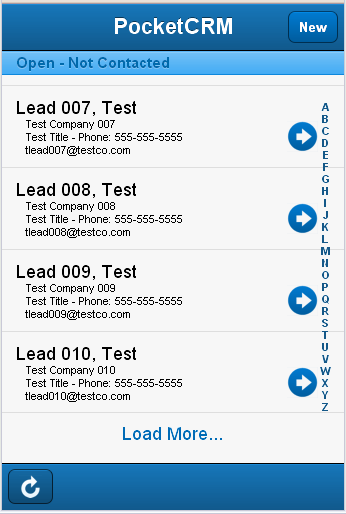
Sencha Touch includes a variety of tools to provide just what we need. We’re going to add a plugin component that automatically provides a “Load More…” paging feature to our Lead list. This component allows us to set a default page size for the initial record load, and as the user scrolls to the bottom of the populated list, the application automatically fetches the next ‘page’ of records based on that default. It also manages adding the newly fetched records to those already in the list, and when all of the records available have been fetched, a “No More Records” message is displayed.
It’s always a best practice to use a maximum fetch limit to ensure that device memory is not exceeded, and because there is likely a ceiling beyond which it makes little sense to continue fetching records into a mobile device. The maximum SOQL offset allowed is 2000, more than enough for our purposes, (and if you really need to be able to fetch more records with SOQL, you can utilize alternate Apex query patterns in your controller.)
However, it isn’t likely that users of mobile devices will be required to manage lists of more than a few hundred records. Even though the Sencha list component can effectively manage lists of up to 1000 items, (depending on device memory and record configuration,) we’ll put a limit of 500 records on the query method in the Apex controller. We’ll also set our pageSize configuration to 25 in the Sencha data store component. The page size value is passed to the Apex controller with the query request, and is used to control paging by the SOQL OFFSET feature.
Fire up your development environment for the PocketCRM app that you last completed in Part 2, (if you’re just tuning in now to the series, you’ll need to go back to Part 1 and Part 2 to build out the application.) We’ll remind you to use Safari with its development tools as a desktop emulator and development environment for your tracing and debugging.
Login to your Salesforce org, and launch the PocketCRM Visualforce page so that the mobile application is up and running in a Safari browser, so that you’ll be able to test the changes we’re about to make to the code.
Step 1: Add The ListPage Plugin To The ListView
Plugins are JavaScript classes that can add additional behavior or appearance to existing components upon their instantiation. You can write your own custom plugins, use those provided by Sencha in the framework, or tap into those built by developers in the Sencha community, many of which are posted and freely available in public repositories such as Git. We’re going to use one of the Sencha provided plugins for our paging mechanism, as it does exactly what we want for our “Load More…” feature.
Open the PocketCRM_APP Visualforce component in your development environment and add the code for the plugins configuration below to the PocketCRM.views.LeadsList component, just after the disableSelection and before the template configurations. It doesn’t have to be placed in any particular sequence in the configuration section, just make sure you have comma delimiters for each configuration that precedes or follows it:
xtype: “list”,
store: “Leads”,
itemId:”leadsList”,
…
disableSelection: false,
plugins: [
{
xclass: ‘Ext.plugin.ListPaging’,
autoPaging: false //set true for automatic fetching when user reaches bottom of the list
}
],
//The template for display if the Store is empty of records.
//Note the style to control visual presentation.
loadingText: “Loading Leads…”,
…
Next, modify the PocketCRM.store.Leads component to reduce the pageSize configuration (on line 9 below) from 50 to 25, so that each successive fetch will add 25 records to the list. You can set this value to any page size you’d like while testing the behavior. The store component should look like this:
extend: “Ext.data.Store”,
requires: “Ext.data.proxy.LocalStorage”,
config: {
model: “PocketCRM.model.Lead”,
autoLoad: true,
//Set your desired PAGE SIZE.
pageSize: 25,
groupField: “Status”,
groupDir: “ASC”,
sorters: [
{ property: ‘LastName’, direction: ‘ASC’},
{ property: ‘FirstName’, direction: ‘ASC’}
]
}
});
After you have modified your code, refresh your application in the browser. If no errors were introduced, it should display as many Lead records as you set for the pageSize, with a link at the bottom to “Load More…” records. Click the link, and you should see another “page” of records appended to the list, and the link displayed again. You can continue to load the list until you hit the LIMIT as set on the SOQL query in the Apex controller’s getAllLeads() helper method, which we had arbitrarily set to 50. Experiment with it to see what happens when the limit is reached, and try bumping up the LIMIT as well to get a feel for the the behavior as you load a larger set of records.
Also notice the plugin’s configuration setting on line 7 above:
Setting this configuration’s value to true will cause the paging to fire automatically each time the user scrolls to the bottom of the list. You can choose whether you want the paging to fire automatically or not for your application, but experiment with both settings now to experience the behavior.
Step 2: Refactor the Apex Controller Query Methods
Now that the paging plugin is in place and functioning, we need to optimize how it will work in conjunction with our SOQL in the Apex controller. Previously, we had included some rudimentary paging logic in the @RemoteAction query method which is why you’re seeing more records served up when each new page is requested.
You can see how we wrote the initial paging logic in the original Apex method. After all Lead records are fetched, a for loop partitions out just the page of records as defined by the start and recordCount properties passed in the request object from the Sencha data proxy.
The existing code looks like this:
public static Response Query(QueryRequest qr){
Response resp = new Response();
List
filterString = qr.searchFilter;
try {
//Fetch all Leads for the user
LeadList = getAllLeads();
} catch (Exception e) {
resp.success = false;
resp.errorMessage = ‘Query failed: ‘ + e.getMessage();
return resp;
}
//Supply only the requested records
for (Integer recno = qr.start; recno < (qr.start + qr.recordCount) && recno < LeadList.size(); ++recno) {
resp.records.add(LeadList[recno]);
}
resp.total = LeadList.size();
resp.success = true;
return resp;
}
The flaw in this pattern is that all Lead records available to the current user are fetched and iterated over with each request, even though only a small number are actually required to be returned; a most inefficient process. Salesforce has a few different patterns available for fetching sets of objects, and we will take advantage of the SOQL OFFSET feature which works well with the page size and record count properties that we have already built, and are available from our request object.
We need to change two methods in our Apex controller to implement the new version of the paging logic. First, we’re going to change the helper method that will return the page of records. The original method looks like this:
return [SELECT FirstName, LastName, Company, Title, Phone, MobilePhone, Email, Status FROM Lead LIMIT 50];
}
Replace that method with the new version below; it’s a bit more code, but actually very straightforward. It simply calculates the paging values using the parameters passed in the request, builds one query to get a count of all records, and another query to fetch the exact page of records based on the calculated paging values. Note the OFFSET and LIMIT portions of the SOQL query.
Also note the SOQL whereClause variable which constructs a filter using the qr.searchFilter property. We’ll use this property shortly to pass a search string from the Sencha application to filter the query, and we’ll initially default its value to a SOQL wildcard so that all records will be fetched for the SELECT. Our code also checks to determine if an empty string is passed, in which case the WHERE clause will simply be omitted from the query.
//Page size is set in the Sencha store as recordCount.
Integer pageSize = qr.recordCount;
//Page number will be calculated.
Integer pageNumber = 0;
//Start is the record number indicating the start of the page.
if (qr.start > 0) {
pageNumber = qr.start / pageSize;
}
//Calculate the offset for SOQL.
Integer offset = pageNumber * pageSize;
//Build the query in pieces.
String fieldList = ‘Id,FirstName,LastName,Company,Title,Phone,MobilePhone,Email,Status’;
String whereClause = (qr.searchFilter != ” ? ‘WHERE Name LIKE ” + qr.searchFilter + ”’ : ”);
String orderByClause = ‘LastName, FirstName’;
//Construct a base query to which the page offsets will be added.
String baseQuery = ‘SELECT ‘ + fieldList + ‘ FROM Lead ‘ + whereClause + ‘ ORDER BY ‘ + orderByClause;
//Construct a count query to pass back the total records matching a search criteria.
String baseCountQuery = ‘SELECT COUNT() FROM Lead ‘ + whereClause;
//Construct the fetch query with the offset.
String fetchQuery = baseQuery + ‘ LIMIT ‘ + pageSize + ‘ OFFSET ‘ + offset;
try {
//Set the count.
resp.total = Database.countQuery(baseCountQuery);
//Set the fetched recordset.
resp.records = Database.query(fetchQuery);
//Set the status flag.
resp.success = true;
} catch (Exception e) {
//Set the total count of records matching the query.
resp.total = 0;
//Set the recordset to return.
resp.records = new List < Lead > ();
//Set the status flag.
resp.success = false;
}
}
The SOQL OFFSET processing is very efficient, fetching only the exact set of records requested. Notice the method takes both the QueryRequest and Response objects as parameters, and sets the properties of the Response object to be sent back to the Sencha application. Before you can save the controller class, you must also modify the @RemoteAction Query() method to work with the new version of the helper method above, replacing the old method with the following code:
public static Response Query(QueryRequest qr){
Response resp = new Response();
//Enforce a limit on the number of rows requested.
final integer QUERY_LIMIT = 500;
if( qr.start >= QUERY_LIMIT ){
resp.success = false;
resp.errorMessage = ‘Maximum number of records (‘ + String.valueOf(QUERY_LIMIT) + ‘) exceeded!’;
return resp;
}
try {
getAllLeads(qr, resp);
} catch (Exception e) {
resp.success = false;
resp.errorMessage = ‘Query failed: ‘ + e.getMessage();
}
return resp;
}
This new version of the method is much simpler. First, it ensures the request has not exceeded the maximum query limit established for the application, and then it sets up and calls the new helper method which does all the real work.
Save your changes to the Apex controller making sure it compiles correctly, and refresh your Sencha application in the browser; it should work exactly as before with the refactored Apex controller class.
Step 3: Clean Up the Proxy Error Listener
While I was running tests during development of the code for this part of the tutorial, I found some bugs in an error handling routine that we built out in the original posting of Part 2 of the series. If your code matches the original code below, please replace it now with the repaired version.
We had added a listener on the data proxy in the init() function of the PocketCRM.controller.Leads component to catch any errors passed back from the Apex controller. The original code below is flawed, and was not correctly displaying the error messages:
//Listen for exceptions observed by the proxy so we can report them and clean up.
Ext.getStore(‘Leads’).getProxy().addListener(‘exception’, function (proxy, response, operation, options) {
// only certain kinds of errors seem to have useful information returned from the server
if (response.data) {
if (response.data.errorMessage) {
Ext.Msg.alert(‘Error’, response.data.errorMessage);
} else {
Ext.Msg.alert(‘Error’, operation.action + ‘ failed: ‘ + response.data.message);
}
} else {
Ext.Msg.alert(‘Error’, operation.action + ‘ failed for an unknown reason’);
}
});
If your version is the flawed code, replace the original code with the repaired code as below that has corrected references to the response and operation objects, The improper references in the JavaScript were not actively breaking anything; the function was just failing silently, but will now properly report errors:
//Listen for exceptions observed by the proxy so we can report them and clean up.
Ext.getStore(‘Leads’).getProxy().addListener(‘exception’, function (proxy, response, operation, options) {
// only certain kinds of errors seem to have useful information returned from the server
if (response) {
if (response.errorMessage) {
Ext.Msg.alert(‘Error’, response.errorMessage);
} else {
Ext.Msg.alert(‘Error’, operation.config.action + ‘ failed: ‘ + response.errorMessage);
}
} else {
Ext.Msg.alert(‘Error’, operation.config.action + ‘ failed for an unknown reason’);
}
});
Save your changes to the JavaScript and refresh your Sencha application in the browser to ensure no new errors were introduced; it should work exactly as before. You will see this routine in action if you page through the list requesting more records, and finally exceed the maximum number allowed by the query method. If you don’t have enough leads to reach the ceiling, simply lower the limit from 500 to a smaller number to see the error handling behavior.
Step 4: Add a Search Field to Filter the Leads
Now that the new paging mechanism and query methods are in place, we can add a Search Field for a user to enter a partial Lead name to filter the query results. We have to add a few moving parts to get this working.
First, we need to modify the PocketCRM.view.LeadsList component, adding a Search Field on the toolbar docked at the bottom of the view. While we’re at it, we’ll also change the position of the refresh button and it’s display icon, which will be used to execute a search after a user has entered some search text.
The Search Field also has an embedded icon, (it appears as an x in a circle to the right of any entered text,) and when clicked or pressed, it clears the entered value. We will add a new listener and event handler on this icon so that when a user clears the search text, a refresh of the data is also fired off.
Since it’s useful to know how many records a user has accumulated in the list, we’ll also add a listener on the list itself, so that when it is refreshed or reactivated, we display the current record count as Badge Text on the refresh button. We could create a label somewhere on the toolbar to display this counter, but space is tight and this will give you an example of how you can set Badge Text on those components (such as buttons) that provide this feature.
Find the JavaScript for the PocketCRM.view.LeadsList component and modify the following code sections. First, find the code for the bottom toolbar in the Items configuration and replace it with the code below. This adds an itemId, a SearchField component, and adjusts the layout of these items with additional spacers. Notice also that we have changed the iconCls of the syncButton component to display a Search rather than a Refresh icon:
{
xtype: “toolbar”,
docked: “bottom”,
itemId: “bottomToolBar”,
items: [
{
xtype: ‘spacer’
},
{
xtype: ‘searchfield’,
itemId:’leadSearchField’,
placeHolder: ‘Name Contains…’
},
{
xtype: “button”,
iconCls: “search”,
iconMask: true,
itemId: “syncButton”
},
{
xtype: ‘spacer’
}
]
},
…
Next, find the listeners configuration, and add these additional listeners after the one for the #leadslist delegate:
listeners: [{
…
,{
//Handles the clear of the Search Field.
delegate: “#leadSearchField”,
event: “clearicontap”,
fn: “onLeadSearchFieldClearIconTap”
},
{
//Handles the refresh of the list.
delegate: “#leadsList”,
event: “refresh”,
fn: “onLeadsListRefresh”,
},
{
//Handles the activate of the view when redisplayed by transition.
event: “activate”,
fn: “onLeadsListViewActivate”,
}]
Finally, add the new functions for each of the new listeners after the final function for the onLeadsListDisclose event, (be sure to precede the new set of functions with a comma delimiter:)
console.log(“clearSearchLeadCommand”);
this.fireEvent(‘clearSearchLeadCommand’, this);
},
onLeadsListRefresh: function () {
console.log(“onLeadsListRefresh”);
this.updateListCounter();
},
onLeadsListViewActivate: function () {
console.log(“onLeadsListViewActivate”);
this.updateListCounter();
},
//Function to get count of records in the list and show on the search button’s badge.
updateListCounter: function () {
var listCount = Ext.getStore(“Leads”).getCount();
this.getComponent(“bottomToolBar”).getComponent(“syncButton”).setBadgeText(listCount);
}
We will add the event handler logic for the clearSearchLeadCommand in the controller shortly. The final function in the set (updateListCounter) is called from both the onLeadsListRefresh and onLeadsListViewActivate event handler functions, and contains logic to update the Badge Text of the syncButton with the current record count. Note how it gets the record count from the data store, and sets the value to the Badge Text of the syncButton in the bottomToolBar component. This is just one example of how to obtain references to components and get/set values within functions.
Save your changes and refresh your Sencha application in the browser to ensure no errors were introduced. You should now see the new Search Field and adjusted button and record count. You can enter a search value, but it won’t yet apply the filter when you reload the list.
Step 5: Refactor the Load to Include the Search Value
We have to modify our reload logic to include the new search value. As this logic is called from more than one place in our code, it will be best to isolate into its own function, and then call as needed from other functions. We’ll also have to make a few other supporting modifications to the PocketCRM.controller.Leads component.
First, we need to add a new controller reference for the new Search Field in the controller’s refs configuration section, it will look like this:
…
//Add a new search field.
leadsListSearchField: “#leadSearchField”
},
Next, we need to add a new control for the new event fired by List View’s event handler function on the Search Field’s clear icon. It will be added in the control configuration section, and will look like this, (make sure to add a comma delimiter after any configuration that precedes the new clearSearchLeadCommand):
leadsListView: {
// The commands fired by the list container.
…
,
//Add an event when clearing the search text.
clearSearchLeadCommand: “onClearSearchLeadCommand”
},
Now we must add the logic to manage the reload of the data, and include any search values entered by the user. Once this function is available, we will call it from a number of other event handlers. Add the new function below all the other event handler functions, but above the launch function:
loadList: function () {
//Get a ref to the store and remove it.
var leadsStore = Ext.getStore(“Leads”);
//Get any search text.
var leadSearchField = this.getLeadsListSearchField();
var searchText = leadSearchField.getValue();
//Validate for at least 2 or more characters.
if (searchText.length > 0 && searchText.length < 2) {
var msg = 'Search requires more text.';
Ext.Msg.alert('Please correct errors!', msg, Ext.emptyFn);
return;
}
//Add wild cards to the search string.
if (searchText != '') {
//Surround the search value with wildcards for SOQL LIKE search.
searchText = '%' + searchText + '%';
} else {
//Set wildcard for wide open filter.
searchText = '%';
}
//Set the value of the searchFilter param to pass with the request for the query.
var model = Ext.ModelMgr.getModel('PocketCRM.model.Lead');
model.getProxy().setExtraParam('searchFilter', searchText);
//Clear all data in the store before reloading it.
//This is necessary to make sure that the proxy doesn't get confused by
//the loss of records removed but not reloaded with a new filter.
//Without the clear(), the proxy assumes a deletion was processed and
//calls a destroy to be executed on missing records with the next sync() operation.
leadsStore.getData().clear();
leadsStore.loadPage(1);
//Show the list.
this.activateLeadsList();
},
Add the following new function to handle the search field clear event, place it after the onBackToHome event handler:
onClearSearchLeadCommand: function () {
console.log(“onClearSearchLeadCommand”);
//Get a ref to the search field.
var leadSearchField = this.getLeadsListSearchField();
leadSearchField.setValue(”);
console.log(“Cleared Field Value: ” + leadSearchField.getValue());
this.loadList();
},
Modify the following event handler functions to also call the new load function:
console.log(“onSyncLeadCommand”);
this.loadList();
},
…
launch: function () {
console.log(“launch”);
this.callParent(arguments);
//Load up the Store associated with the controller and its views.
console.log(“load Leads”);
this.loadList();
},
Remember to take care to include all commas and curly braces as needed or your JavaScript will break. This was a lot of code to change, hopefully we will not have introduced any errors. Save your changes and refresh your Sencha application in the browser to ensure all is well.
Now, enter a search value into the new Search Field and click the search button. If all your changes are working properly, the list should refresh showing only records matching your search criteria. If there are more records matching your search than the default page size, you should be able to load additional records by clicking the “Load More…” link. Continue to fetch more records until you see the “No More Records” message. If the number of records you have loaded into the list exceeds the maximum as configured in the Apex controller’s Query method, you should see an error message alert, (thanks to our repaired Apex error listener.)

Clicking the clear icon in the Search Field should remove the search value from the text box and refresh the list with the original record set displayed. In each case, you should see the record counter change in the search button’s Badge Text. To ensure that the counter refresh events are also working properly after CRUD operations, try to add and then delete a new lead. Each time the List is re-displayed following such an operation, you should see the record counter adjust correctly reflecting the newly added or removed record in the count.
Using the Web Inspector developer tool from Safari, you can trace the proxy request when the search and reload operations are executed. You can inspect the JSON request payload sent to the Salesforce remoting service which should look like this for a search, note the value of the searchFilter which includes the SOQL wildcards:
“action”: “PocketCRMLeadController”,
“method”: “Query”,
“data”: [{
“searchFilter”: “%22%”,
“start”: 0,
“recordCount”: 25
}
],
“type”: “rpc”,
“tid”: 8,
“ctx”: {
“csrf”: “rUvT8gN3e0D50m2xK4bzRzvhRMlOLqNZFO6QZu3l2T.D2NrF6T0VUggRNmn4ssjNER_At7gsWui4U2yWpxSnzXzawt2Dn6jhpM2ez15tL5ztVihbH63dBQ.2F4c29tY4QYuAWtSuZreRdWbl1hGz67ZH1q3RI2m6By2201K6g6sVdrVF”,
“vid”: “06650000000DAsF”,
“ns”: “”,
“ver”: 24
}
}
Each request for more data will increase the start property. Here’s what it looks like for a request of the third page with no filter value, (note the passed wildcard character for an empty search value:)
“action”: “PocketCRMLeadController”,
“method”: “Query”,
“data”: [{
“searchFilter”: “%”,
“start”: 50,
“recordCount”: 25
}
],
“type”: “rpc”,
“tid”: 11,
“ctx”: {
“csrf”: “rUvT8gN3e0D50m2xK4bzRzvhRMlOLqNZFO6QZu3l2T.D2NrF6T0VUggRNmn4ssjNER_At7gsWui4U2yWpxSnzXzawt2Dn6jhpM2ez15tL5ztVihbH63dBQ.2F4c29tY4QYuAWtSuZreRdWbl1hGz67ZH1q3RI2m6By2201K6g6sVdrVF”,
“vid”: “06650000000DAsF”,
“ns”: “”,
“ver”: 24
}
}
Summary
Let’s recap what we accomplished:
- We added a Sencha ListPaging plugin to provide “scroll down” paging to automatically fetch more records when a user scrolls to the bottom of the list. There are other plugins available with similar but alternate behavior, some provide next and previous paging, others provide a “Pull Down” type fetch. If you want to get adventurous, you can even write your own.
- We redesigned the querying capability of our Apex controller class to provide efficient data paging using SOQL OFFSET and a search filter, and we set an upper limit on the number of records that can be fetched by the client application.
- We added a Search Field in the list view, allowing a user to filter records fetched from Salesforce by a search on any portion of a Lead’s first or last name. You can also rewrite the Apex controller to use SOSL for a fulltext search, or build out a more complex dynamic query capability.
- We added the display of a record count reflecting the current list content that refreshes with each reload of data.
- Finally, we fixed a bug in the data proxy listener to properly display errors returned from our Apex controller.
You can find the full code for the completed application for Part 3 here at GitHub.
Closure
In the next part or our series, we’ll expand our application to provide an appropriate user interface for a tablet device, in addition to a phone, by leveraging the Sencha Touch profile feature. This feature adds the capability to identify the device type loading the application, permitting a single code base to support multiple form factors. By isolating alternate sets of components to support different devices, applications can also share larger collections of components for common functionality in the remainder of the codebase.
In the meantime, I encourage you to continue your Force.com and Sencha Touch mobile ramp-up by watching videos, playing with and dissecting samples, and reading through the great online guidance documentation. You should now also have enough knowledge under your belt to build a simple application of your own using all the design patterns from the tutorial to date. Also, definitely check out the features and functions of the recently announced Salesforce Touch Platform; you can go here to download a free eBook and read all about it.
What's your reaction?
 0
0

 0
0

Latest Content

Discover the Top 07 Architecture Patterns used in Modern Enterprise Software Development
Developing software without an architecture pattern may have been an option back then. However, that’s…
April 11, 2024

JavaScript Design Patterns: A Hands-On Guide with Real-world Examples
As a web developer, you know how popular JavaScript is in the web app development…
March 26, 2024
Virtual JS Days 2024のハイライト
2024年2月20日~22日、第3回目となる「Virtual JavaScript Days」が開催されました。JavaScript の幅広いトピックを採り上げた数多くのセッションを実施。その内容は、Senchaの最新製品、ReExt、Rapid Ext JSまで多岐にわたり、JavaScriptの最新のサンプルも含まれます。 このカンファレンスでは多くのトピックをカバーしています。Senchaでセールスエンジニアを務めるMarc Gusmano氏は、注目すべきセッションを主催しました。Marc は Sencha の最新製品「ReExt」について、詳細なプレゼンテーションを実施。その機能とメリットを、参加者に理解してもらうべく詳細に説明しました。 カンファレンスは、Senchaのジェネラルマネージャを務めるStephen Strake氏によるキーノートでスタートしました。キーノートでは、会社の将来のビジョンについての洞察を共有しています。世界中から JavaScript 開発者、エンジニア、愛好家が集まるとてもエキサイティングなイベントとなりました。これは、JavaScript…
March 25, 2024


