

 Rapid Ext JS (beta)


Top 10 Ext JS Development Practices to Avoid
July 12, 2013
168 Views
Guest Blog Post
 At CNX, although most of our development work in the Ext JS space entails creating new apps from scratch, occasionally our clients ask us to look at some of their existing internal work to address performance issues, bugs and structural problems. Having worked in this capacity as “cleaners” for quite some time now, we’ve noticed a common set of ill-advised coding practices that tend to pop up rather often in the apps we’re investigating. Based on a review of our work over the last few years, we came up with this list of the top 10 development practices we recommend you avoid in Ext JS apps build in the best js framework.
1. Excessive or unnecessary nesting of component structures
One of the most common mistakes developers make is nesting components for no reason. Doing this hurts performance and can also cause unappealing aesthetics in the app with oddities such as double borders or unexpected layout behavior. In example 1A below, we have a panel that contains a single grid. In this case, the panel is unnecessary. As shown in example 1B, the extra panel can be eliminated. Remember that forms, trees, tab panels and grids all extend from Panel, so you should especially watch for unnecessary nesting conditions whenever using these components.
items: [{
xtype : ‘panel’,
title: ‘My Cool Grid’,
layout: ‘fit’,
items : [{
xtype : ‘grid’,
store : ‘MyStore’,
columns : [{…}]
}]
}]
Example 1A. BAD: The ‘panel’ is unnecessary.
layout: ‘fit’,
items: [{
xtype : ‘grid’,
title: ‘My Cool Grid’,
store : ‘MyStore’,
columns : [{…}]
}]
Example 1B. GOOD: The grid is already a panel so just use any panel properties directly on the grid.
2. Memory leaks caused by failure to cleanup unused components.
Many developers wonder why their apps get slower and slower the longer they are used. Failure to cleanup unused components as a user navigates throughout an app is one of the biggest reasons. In example 2A below, each time the user right-clicks on a grid row, a new context menu is created. If the user keeps this app open and right-clicks the row hundreds of times, they will wind up with hundreds of context menus that will never be destroyed. To the developer and user, the app “looks” visually correct because only the last context menu created is seen on the page. The rest are hidden away. As new menus are created without the old ones being cleaned up, the memory utilization for the app will keep increasing. This will eventually result in slower operation or a browser crash.
Example 2B is better because the context menu is created once when the grid is initialized and is simply reused each time the user right-clicks a row. However, if the grid is destroyed, the context menu will still exist even though it is no longer needed. The best scenario is example 2C where the context menu is destroyed when the grid is destroyed.
Ext.define(‘MyApp.view.MyGrid’,{
extend : ‘Ext.grid.Panel’,
columns : [{…}],
store: ‘MyStore’,
initComponent : function(){
this.callParent(arguments);
this.on({
scope : this,
itemcontextmenu : this.onItemContextMenu
});
},
onItemContextMenu : function(view,rec,item,index,event){
event.stopEvent();
Ext.create(‘Ext.menu.Menu’,{
items : [{
text : ‘Do Something’
}]
}).showAt(event.getXY());
}
});
Example 2A. BAD: A menu will be created on every right-click and won’t ever be destroyed.
Ext.define(‘MyApp.view.MyGrid’,{
extend : ‘Ext.grid.Panel’,
store : ‘MyStore’,
columns : [{…}],
initComponent : function(){
this.menu = this.buildMenu();
this.callParent(arguments);
this.on({
scope : this,
itemcontextmenu : this.onItemContextMenu
});
},
buildMenu : function(){
return Ext.create(‘Ext.menu.Menu’,{
items : [{
text : ‘Do Something’
}]
});
},
onItemContextMenu : function(view,rec,item,index,event){
event.stopEvent();
this.menu.showAt(event.getXY());
}
});
Example 2B. BETTER: Menu will be created when the grid is created and be reused each time.
Ext.define(‘MyApp.view.MyGrid’,{
extend : ‘Ext.grid.Panel’,
store : ‘MyStore’,
columns : [{…}],
initComponent : function(){
this.menu = this.buildMenu();
this.callParent(arguments);
this.on({
scope : this,
itemcontextmenu : this.onItemContextMenu
});
},
buildMenu : function(){
return Ext.create(‘Ext.menu.Menu’,{
items : [{
text : ‘Do Something’
}]
});
},
onDestroy : function(){
this.menu.destroy();
this.callParent(arguments);
},
onItemContextMenu : function(view,rec,item,index,event){
event.stopEvent();
this.menu.showAt(event.getXY());
}
});
Example 2C. BEST: When the grid is destroyed, the context menu is also destroyed.
3. Monster controllers
It’s amazing how many times we see apps that have one huge controller with thousands of lines of code. We tend to favor breaking up our controllers by app function. For example, an order processing app might have individual controllers for line items, shipments, customer lookup, etc. It makes navigating and maintaining the code much easier.
Some developers like to break out controllers by view. For example, if an application had a grid and a form, there would be a controller to manage the grid and a controller to manage the form. There is no one “right” way to separate controller logic as long as you are consistent. Just remember, controllers can communicate with other controllers. In example 3A, you can see how to retrieve a reference to another controller and call one of its methods.
this.getController(‘SomeOtherController’).runSomeFunction(myParm);
Example 3A. Get a reference to another controller and call a method.
Alternately you could fire an application level event that any controller can listen for. In examples 3B and 3C, you can see how one controller can fire an app-level event and another controller can listen for it.
MyApp.getApplication().fireEvent(‘myevent’);
Example 3B. Fire an app-level event.
MyApp.getApplication().on({
myevent : doSomething
});
Example 3C. Another controller listens for the app-level event.
Note: Beginning with Ext JS 4.2, it gets even easier to use multiple controllers — they can fire events that other controllers can listen for directly.
4. Poor folder structure for source code
This doesn’t affect performance or operation, but it makes it difficult to follow the structure of your app. As your app grows, finding source code and adding features and functionality will be much easier if you organize your source code. We have seen that many developers will put all views (even for a large app) in one folder as shown in example 4A. We recommend adding organization to the views by logical function as shown in example 4B.
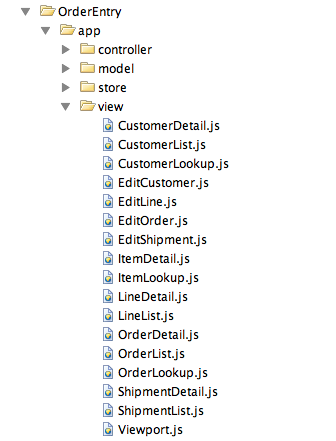
Example 4A. BAD: All views are at one level.
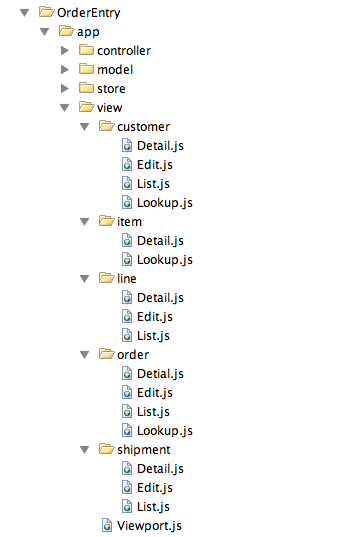
Example 4B. GOOD: Views are organized by logical function.
5. Use of global variables
Even though it’s widely known that global variables are bad, we have still see them used in some of the apps that we have recently reviewed. Apps that use global variables can have significant problems with name collisions and can be hard to debug. Instead of using global variables, we will hold “properties” in a class and then reference those properties with getters and setters.
For example, suppose your application needed to remember the last selected customer. You might be tempted to define a variable in your app as shown in example 5A. It’s easy and the value is conveniently available to all parts of your app.
myLastCustomer = 123456;
Example 5A. BAD: Global variable created to store last customer number.
Instead, it’s a better practice to create a class that holds properties intended to be used “globally.” In this case, we will create a file called Runtime.js to hold runtime properties intended to change as the app is used. Example 5B shows the location for Runtime.js in our source code structure.
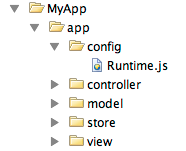
Example 5B. Location of the Runtime.js file.
Example 5C shows the contents of Runtime.js and example 5D shows how to “require” it in your app.js. You can then “set” and “get” your properties as shown in 5E and 5F from anywhere in the app.
Ext.define(‘MyApp.config.Runtime’,{
singleton : true,
config : {
myLastCustomer : 0 // initialize to 0
},
constructor : function(config){
this.initConfig(config);
}
});
Example 5C. Sample Runtime.js file to hold global properties for an app.
Ext.application({
name : ‘MyApp’,
requires : [‘MyApp.config.Runtime’],
…
});
Example 5D. Require the Runtime class in your app.js file.
MyApp.config.setMyLastCustomer(12345);
Example 5E. How to set the last customer.
MyApp.config.getMyLastCustomer();
Example 5F. How to get the last customer.
6. Use of “id”
We don’t recommend the use of id’s on components because each id must be unique. It’s too easy to accidentally use the same id more than once, which will cause duplicate DOM id’s (name collisions). Instead, let the framework handle the generation of id’s for you. With Ext JS ComponentQuery, there is no reason to ever have to specify an id on an Ext JS component. Example 6A shows two code segments of an app where there are two different save buttons created, both of which were identified with an id of ‘savebutton’, causing a name collision. Although obvious in the code below, it can be hard to identify name collisions in a large application.
// here we define the first save button
xtype : ‘toolbar’,
items : [{
text : ‘Save Picture’,
id : ‘savebutton’
}]
// somewhere else in the code we have another component with an id of ‘savebutton’
xtype : ‘toolbar’,
items : [{
text : ‘Save Order’,
id : ‘savebutton’
}]
Example 6A. BAD: Assigning a duplicate ‘id’ to a component will cause a name collision.
Instead, if you want to manually identify each component you can simply replace the ‘id’ with ‘itemId’ as shown in example 6B. This resolves the name conflict, and we can can still get a reference to the component via itemId. There are many ways to retrieve a reference to a component via itemId. A few methods are shown in example 6C.
xtype : ‘toolbar’,
itemId : ‘picturetoolbar’,
items : [{
text : ‘Save Picture’,
itemId : ‘savebutton’
}]
// somewhere else in the code we have another component with an itemId of ‘savebutton’
xtype : ‘toolbar’,
itemId: ‘ordertoolbar’,
items : [{
text : ‘Save Order’,
itemId: ‘savebutton’
}]
Example 6B. GOOD: Create components with an ‘itemId’.
var pictureSaveButton = Ext.ComponentQuery.query(‘#picturetoolbar > #savebutton’)[0];
var orderSaveButton = Ext.ComponentQuery.query(‘#ordertoolbar > #savebutton’)[0];
// assuming we have a reference to the “picturetoolbar” as picToolbar
picToolbar.down(‘#savebutton’);
Example 6C. GOOD: Referencing components by ‘itemId’.
7. Unreliable referencing of components
We sometimes see code that relies on component positioning in order to get a reference. This should be avoided as the code can easily be broken if any items are added, removed or nested within a different component. Example 7A shows a couple common cases.
var mySaveButton = myToolbar.items.getAt(2);
var myWindow = myToolbar.ownerCt;
Example 7A. BAD: Avoid retrieving component references based on component positioning.
Instead, use ComponentQuery, or the component “up” or “down” methods, to retrieve references as shown in example 7B. With this technique the code will be less likely to break if the structure or ordering of components is subsequently changed.
var mySaveButton = myToolbar.down(‘#savebutton’); // searching against itemId
var myWindow = myToolbar.up(‘window’);
Example 7B. GOOD: Use ComponentQuery to retrieve relative references.
8. Failing to follow upper/lowercase naming conventions
There are certain upper/lowercase standards that Sencha follows when naming components, properties, xtypes, etc. To avoid confusion and to keep your code clean, you should follow the same standards. Example 8A shows several incorrect scenarios. Example 8B shows the same scenarios with the correct upper/lowercase naming conventions.
Ext.define(‘MyApp.view.customerlist’,{ // should be capitalized and then camelCase
extend : ‘Ext.grid.Panel’,
alias : ‘widget.Customerlist’, // should be lowercase
MyCustomConfig : ‘xyz’, // should be camelCase
initComponent : function(){
Ext.apply(this,{
store : ‘Customers’,
….
});
this.callParent(arguments);
}
});
Example 8A. BAD: Areas in bold type have incorrect upper/lowercase naming.
Ext.define(‘MyApp.view.CustomerList’,{
extend : ‘Ext.grid.Panel’,
alias : ‘widget.customerlist’,
myCustomConfig : ‘xyz’,
initComponent : function(){
Ext.apply(this,{
store : ‘Customers’,
….
});
this.callParent(arguments);
}
});
Example 8B. GOOD: Areas in bold follow all of the correct upper/lowercase rules.
Additionally, if you are firing any custom events, the name of the event should be all lowercase. Of course, everything will still work if you don’t follow these conventions, but why stray outside of the standards and write less clean code?
9. Constraining a component to a parent component’s layout
In example 9A, the panel will always have the ‘region:center’ property and thus would not work if you ever wanted to reuse the component and put it in a “west” region, for example.
Ext.define(‘MyApp.view.MyGrid’,{
extend : ‘Ext.grid.Panel’,
initComponent : function(){
Ext.apply(this,{
store : ‘MyStore’,
region : ‘center’,
……
});
this.callParent(arguments);
}
});
Example 9A. BAD: The ‘center’ region should not be specified here.
Instead, specify the layout configuration when creating the component as shown in example 9B. This way, you can reuse the component anywhere you like and not be constrained by the layout configuration.
Ext.define(‘MyApp.view.MyGrid’,{
extend : ‘Ext.grid.Panel’,
initComponent : function(){
Ext.apply(this,{
store : ‘MyStore’,
……
});
}
});
// specify the region when the component is created…
Ext.create(‘MyApp.view.MyGrid’,{
region : ‘center’
});
Example 9B. GOOD: Specify the region when creating the component.
As shown in example 9C, you can also provide a default region on the component that could be overridden if necessary.
Ext.define(‘MyApp.view.MyGrid’,{
extend : ‘Ext.grid.Panel’,
region : ‘center’, // default region
initComponent : function(){
Ext.apply(this,{
store : ‘MyStore’,
……
});
}
});
Ext.create(‘MyApp.view.MyGrid’,{
region : ‘north’, // overridden region
height : 400
});
Example 9C. Also GOOD: Specify a default region and override if necessary.
10. Making your code more complicated than necessary
There are many times we see code that is more complicated than necessary. This is usually a result of not being entirely familiar with each component’s available methods. One of the most common cases we see is code that loads each form field from a data record individually. Example 10A shows an example of this.
// suppose the following fields exist within a form
items : [{
fieldLabel : ‘User’,
itemId : ‘username’
},{
fieldLabel : ‘Email’,
itemId : ‘email’
},{
fieldLabel : ‘Home Address’,
itemId : ‘address’
}];
// you could load the values from a record into each form field individually
myForm.down(‘#username’).setValue(record.get(‘UserName’));
myForm.down(‘#email’).setValue(record.get(‘Email’));
myForm.down(‘#address’).setValue(record.get(‘Address’));
Example 10A. BAD: Loading form fields from a record individually.
Instead of loading each value individually, use the loadRecord method to load all fields from the record into the proper form fields with one line of code. The key is to make sure the “name” property of the form field matches the field name of the record as shown in example 10B.
items : [{
fieldLabel : ‘User’,
name : ‘UserName’
},{
fieldLabel : ‘Email’,
name : ‘Email’
},{
fieldLabel : ‘Home Address’,
name : ‘Address’
}];
myForm.loadRecord(record);
Example 10B. GOOD: Use loadRecord to load all form fields with one line of code.
This is just one example of ways code can be more complicated than necessary. The point is to review all of a component’s methods and examples to make sure you are using simple and proper techniques.

CNX Corporation is a Sencha Certified Select Partner. The Sencha Partner Network is a valuable extension of the Sencha Professional Services team.
CNX has been a leader in the development of custom business apps since 1996. CNX standardized its browser-based user interface development on Ext JS in 2008, adding Sencha Touch as a standard for mobile development in 2010. We have created world-class web apps for customers around the world in many industries including Education, Finance, Food, Law, Logistics, Manufacturing, Publishing and Retail. Our development teams are based at our corporate office in downtown Chicago and can handle projects of any scale. CNX can work independently or with your team to achieve project goals in a fast and cost-effective manner. Check us out at http://www.cnxcorp.com.
What's your reaction?
 0
0

 0
0

Latest Content

Ext JS Performance Optimization for Large-scale Applications
Are you facing issues with Ext JS applications’ performance as they scale up? Don’t worry!…
April 23, 2024

Ext JS Dynamic Forms: Hands-On Guide to Create Data Forms
Dynamic forms are changing the online world these days. ExtJS can help you integrate such…
April 23, 2024

How to Write Unit Tests with Sencha Test
In modern software development, unit testing has become an essential practice to ensure the quality…
April 22, 2024


