Top Support Tips
Get a summary of this article:
Grid Watermarking
by Kevin Cassidy
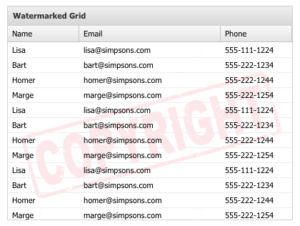
The Ext JS grid is a great tool for presenting information in a handy layout. Some users may want to print this information for use in meetings or promotional materials. However, you may find yourself in a situation where you’d like to be able to watermark the grid content as copyrighted, confidential, or branded in some fashion.
This can be easily achieved in Ext JS grids by specifying a style to apply to the grid, and incorporating some simple CSS tricks.
The key to achieving this effect is to change the styling of a grid cell, and to introduce a background to the grid that has an opacity that does not obscure the grid content.
To do this, begin by creating a new class for grid styling. For this example, we will call this style ‘watermark’, and it will be used by the ‘cls’ grid configuration:
cls: ‘watermark’
Now you can start defining the CSS responsible for creating the watermark effect.
By default, all grid cells have a background color of white. The first step in this task is to change the cells, so their background is transparent. To do this, we first define a CSS selector including the ‘watermark’ class to make grid cells transparent:
.watermark .x-grid-item {
background: transparent !important;
}
The next step is to create the watermark itself.
.watermark .x-grid-body:before {
content: ' ';
display: block;
position: absolute;
left: 0;
top: 0;
width: 100%;
height: 100%;
z-index: 1;
opacity: 0.1;
background: url(http://url.to.watermark.jpg) center !important;
background-size: cover !important;
}
The above style inserts content before the grid body and positions it to completely cover the grid content. The content of this element is empty but a background image is applied, centered, and configured to fill the element entirely. The opacity above is set at 0.1 (10%), but this can be adjusted to suit your requirements.
Note: Depending on your client and its capabilities, the specification of the opacity and background image properties (especially for older IE versions) may need to be changed accordingly. Printing of background images may also need to be manually enabled during the printing process.
Instances on Class Definition
by Tristan Lee
Every so often, we see reports of users trying to create multiple instances of a component, but the additional instances are failing for an unknown reason. The first instance works, but why not the rest? Let’s take a look at a common scenario of a grid:
Ext.define('SimpsonGrid', {
    extend: 'Ext.grid.Panel',
    alias: 'widget.simpsongrid',

    width: 400,
    height: 400,
    store: {
        type: 'users'
    },

    columns: [{
        text: 'First Name',
        dataIndex: 'firstname'
    }, {
        text: 'Last Name',
        dataIndex: 'lastname'
    }],

    plugins: [Ext.create('Ext.grid.plugin.RowExpander', {
        rowBodyTpl: '
‘ })] });
Here, we are defining a simple grid that uses a RowExpander plugin to display content in a second row body. This is common for displaying additional details for a specific record. Let’s assume our application requires multiple instances of this grid to show the information in different views. This is where we have the potential to run into trouble.
An instance of the RowExpander class is applied to the prototype of the SimpsonGrid class. This means that all instances of the SimpsonGrid class will now reference the same plugin instance. This will certainly cause issues when trying to expand a row body on your first grid instance. You may even see that it affects the second instance instead.
To avoid this, use a config object and let the framework handle instancing:
plugins: [{
     ptype: 'rowexpander',
     rowBodyTpl: '
‘ }]
Now, each instance of the grid will have its own instance of the plugin. To view the negative effects of sharing the plugin instance, observe the behavior in this example fiddle.
Creating Builds with Sencha Cmd Compile
by Fred Moseley
With most applications, you will use sencha app build to compile your application’s JavaScript. While this is sufficient for the vast majority of scenarios, there are situations in which you need more control over your compilation and want to go beyond the standard processing.
For example, let’s say you have multiple applications within a workspace for which you want to create a single app.js file that includes the necessary files for all the applications. Alternatively, you may want to create a custom build of the framework with only the required framework classes for these multiple applications. In these scenarios, you can use sencha compile.
Compiling Application Code
The following response file will create an optimal build of your application source myapp.js and only the framework classes that it requires.
compile
    #comma delimited list of paths to the app folders of the
    #applications you want to use to create custom framework.js
    #also include any other paths you include in your applications classpath in app.json
    -classpath=app,app.js

    #transitive/recursive union with the classes
    #required by your application
    union
        -r
        -namespace=MyAppName

    and

    #remove development mode preprocessor directives/warnings
    -debug=false

    concat
        #Compresses the source file using the YUI
        -yui

        #Strips comments from the output file, but preserves whitespace
        -strip

        #output filename
        -out=myapp.js
You can create a response file with this command. Let’s call the file compile.cfg. The response file can be executed with the following command:
sencha @compile.cfg
The resulting myapp.js file should contain all the needed classes for the application(s).
Response files are covered in the Advanced Sencha Cmd guide.
Compiling Required Framework Classes
Using the exclude option, you can easily modify this response file to contain just your application source or just the framework.
The following will create a file called framework.js with just the necessary framework files to run your application.
compile
    -classpath=app,app.js
    union
        -r
        -namespace=MyAppName
    and

    #exclude the application namespace
    exclude
        -namespace=MyAppName

    and
    -debug=false
    concat
        -yui
        -strip
        -out=framework.js

In enterprise application development, charts transcend their role as mere visual aids – they become…

Our recent webinar spotlighted a product that aims to remove one of the biggest friction…

Rapid Ext JS is a low-code visual editor delivered as a Visual Studio Code extension…


