


 Ask Sencha AI
Top Support Tips
November 17, 2015
2167 Views
Get a summary of this article:
Full-Width Field Error Messages
by Kevin Cassidy
Have you ever wanted your validation messages to appear under your form field (msgTarget: ‘under’), but found that the validation message was squashed because of the way the message only appears under the input field? Well, here’s a simple trick to fix that and use the entire width of the field and label.
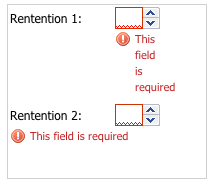
You can achieve this visual effect by overriding the error message’s styles. To apply this to a single instance of a field, simply add a cls value to the field as shown below :
{
    xtype: 'numberfield',
    cls: 'full-width-error',
    fieldLabel: 'Rentention 2',
    allowBlank: false,
    width: 150,
    msgTarget: 'under'
}
Finally, just override the message styles:
    .full-width-error .x-form-error-wrap-under-side-label::before {
display: none !important;
    }
    .full-width-error .x-form-error-wrap-under .x-form-error-msg {
	display: block !important;
	width: 150px !important;
    }
Using Response Files for More Readable Build Scripts
by Joel Watson
If you are using custom build scripts to compile your application, you know that it can be a bit tedious to maintain a readable and understandable chain of commands. For example, you might have something like this:
sencha compile -classpath=app.js concat --strip-comments --compress --output-file=full-app-output.js
This is a simplistic example, but you can see how it could become difficult to maintain as it grows in complexity.
Fortunately, Sencha Cmd allows you to create “response files”. These files give you the ability to maintain the commands in a separate file, which you can then tell Sencha Cmd to read in lieu of manually entering the commands in the CLI.
With this in mind, our difficult-to-maintain chain of commands above can be transformed to a response file, like so:
// File name: response-file.sencha
compile
        -classpath=app.js
concat
        # remove comments
        --strip-comments
        # compress with YUI
        --compress
        # save to full-app-output.js
        --output-file=full-app-output.js
In the syntax of a response file, each line is interpreted as a command line argument. However, if the line begins with “#”, it is skipped. This provides a convenient way to create “comments” in your response files that can be useful for reminding yourself why a particular argument is used, or even documenting the rationale of the command chain for team members.
Now that our response file is created, using it is super-simple:
sencha @response-file.sencha
Easy, right? With very little effort, we’ve used a response file to transform a difficult-to-read command chain into an easy-to-follow format, and we can even drop this into source control now.
Uncompressed Native Builds
by Fred Moseley
Uncompressed/testing builds are useful for debugging your Ext JS applications. But how do you create an uncompressed build of a Cordova/PhoneGap packaged application? In Sencha Cmd 6, you can now create uncompressed builds of your Cordova/PhoneGap packaged applications with the following command:
sencha app build {build-name} testing
The {build-name} is the name that you have specified in your app.json build object.
"builds": {
    "native": {
        "packager": "cordova",
        "cordova" : {
            "config": {
                "platforms": "ios"
                "id": "com.mydomain.MyApp"
            }
        }
    }
}
For example, to create an uncompressed build for the build object specified above, the command would be:
sencha app build native testing
This will make it much easier to debug issues you are experiencing with Cordova/PhoneGap packaged applications.


Latest Content

What we're building next: Sencha 2026/2027 Roadmap Update
In this Sencha 2026/2027 roadmap update, you’ll find a detailed summary of what we’ve planned…
July 23, 2026

12 Best Application Development Software Tools for Enterprise Teams in 2026
Enterprise teams in 2026 build applications using a stack of complementary application development software tools…
July 16, 2026

7 Best React Data Grids in 2026: Performance, Features, and Pricing Compared
React data grid selection significantly affects enterprise application development outcomes because grids are often the…
July 16, 2026


