


 Ask Sencha AI
Using Ext JS Components in Your React Apps – Part 1
March 30, 2017
3492 Views
Get a summary of this article:

Integrating powerful UI components into React applications is challenging. This is especially true for developers creating enterprise-level apps. Ext JS React integration enables developers to combine React’s flexibility with Ext JS’s robust, enterprise-grade UI components, delivering high-performance, data-driven applications with seamless user experiences.
Ext JS, known for its advanced grid, chart, and layout components, is built for high-performance, data-intensive applications. Using the “Ext JS Reactor” package, React developers can easily bring Ext JS components into their apps. This blend offers the best of both frameworks, enabling fast, scalable, and visually dynamic applications.
In this first part of our series, we’ll cover the basics of “Using Ext JS Components in Your React Apps.” You’ll learn the initial steps to incorporate Ext JS into a React environment. This includes installing the necessary packages, setting up Webpack and Babel, and creating a basic grid component.
Let’s get started.
Why Should You Use Ext JS Components in Your React Apps?
Integrating Ext JS components into your React data intensive applications offers several advantages:
Rich UI Components
Ext JS provides over 140 pre-built UI components. These components are fully tested and highly customizable. They facilitate rapid development of interactive user interfaces. This allows developers to create complex applications efficiently.
Robust Data Management
Ext JS includes a comprehensive data package. It simplifies data binding, sorting, and filtering. This robust system is beneficial for large-scale applications. It supports intricate features and a high degree of customization.
Cross-Browser Compatibility
Applications built with Ext JS function seamlessly across different browsers. This enhances user experience. Cross-browser compatibility ensures your application reaches a wider audience. It does so without compromising functionality.
Enhanced Security
As a proprietary framework, Ext JS offers enhanced security features. This reduces risks associated with open-source frameworks. The focus on security makes Ext JS a reliable choice. It’s suitable for building enterprise-grade applications.
Integration Tools
Tools like Sencha Themer allow easy customization of component appearances. They ensure a cohesive and consistent look and feel in your React applications. This integration provides flexibility. It helps you choose the best tools for specific project requirements.

Also Read: Top Mistakes Developers Make When Using React UI Component Library (And How to Avoid Them)
What Should You Consider Before Integrating Ext JS Components in Your React Apps?
Integrating Ext JS components into your React applications can enhance functionality and user experience. However, consider several factors before proceeding.
Licensing and Cost
Ext JS is a commercial framework. It requires a valid license for development and distribution. Evaluate licensing costs against your project’s budget. Ensure it aligns with financial constraints.
Learning Curve
Ext JS has a distinct architecture and design from React. Your team may need time to learn Ext JS concepts. This could affect project timelines. Assess your team’s familiarity with Ext JS. Plan for any necessary training.
Integration Complexity
Combining Ext JS with React requires configuring tools like Webpack and Babel. Confirm your environment can handle these configurations. Review the integration process for potential challenges. Prepare accordingly.
Performance Considerations
Ext JS components are feature-rich but can be resource-intensive. Analyze how these components will affect performance, especially load times and responsiveness. Conduct performance testing to mitigate issues.
Community and Support
Ext JS has a smaller community than React. This may limit third-party plugins, tutorials, and support. Consider the impact on troubleshooting and ongoing maintenance.
Long-Term Maintenance
Integrating Ext JS components adds complexity to your codebase. Plan for long-term maintenance, including updates and potential refactoring. Ensure your team can manage these integrated technologies over time.
Project Requirements
Consider if Ext JS components meet your project’s needs. If your application requires complex data grids or charts, Ext JS can be beneficial. For simpler interfaces, however, the added complexity may not be justified.
By carefully evaluating these factors, you can make an informed decision.

Getting Started
React.js has become a preferred choice among developers due to its intuitive component-based architecture, straightforward view syntax, and efficient rendering capabilities.
Similarly, Ext JS offers a declarative approach to building user interfaces. To bridge these two powerful frameworks, we have developed “Ext JS Reactor,” a package that seamlessly integrates Ext JS’s robust, feature-rich components into React-based applications.
Ext JS Reactor simplifies the incorporation of Ext JS components into React apps, enabling developers to leverage advanced features such as grids, pivot grids, exporters, layouts, charts, and D3 adapters. This integration facilitates the creation of sophisticated web applications with enhanced functionality.
Our comprehensive React offering includes Ext JS Reactor, along with Webpack and Babel plugins, and several boilerplate examples to streamline the development process. These tools collectively provide a cohesive environment for building high-performance web applications.
We are actively developing a packaged product that will further simplify the process of integrating Ext JS components into your React applications. This forthcoming solution aims to provide all necessary components in a convenient package, enhancing the efficiency of your development workflow.
In this article, we will provide examples to help you get started with Ext JS Reactor. Please note that the integration process will become even more straightforward with the release of our upcoming packaged product.
Prerequisites
Step 1: Install the Required Packages
To begin, you’ll need to install the essential packages:
- Sencha Ext JS 6.2
- Sencha Cmd 6.2
- Recent versions of Node.js and npm
Note: Ext JS requires a valid license, but Ext JS Reactor is compatible with both trial and standard Ext JS licenses.
Step 2: Explore Ext JS Reactor on GitHub
Next, visit the Ext JS Reactor repository on GitHub. Here, you’ll find additional resources to help you get started, including setup information and sample projects.
Step 3: Add Ext JS Reactor and Plugins
Once you have the basics installed, incorporate the Ext JS Reactor into your project. For optimal performance and compatibility, we recommend also adding plugins for Webpack and Babel, as outlined in the Ext JS Reactor documentation.
Step 4: Start with a Standard React Project
Before diving into the specifics of Ext JS, make sure you have a standard React project ready. There are two main scenarios for integrating Ext JS components:
- Creating a New Project from Scratch
- Set up a new React project and configure it to use Ext JS components from the beginning.
- Modifying an Existing React Project
If you’re working with an existing React project, follow the integration steps to incorporate Ext JS components, enabling you to leverage Ext JS’s robust UI capabilities within your current app structure.
Starting from Scratch
To start a new project using one of our boilerplate configurations, follow these steps:
1. Clone the Ext JS Reactor Repository
Begin by cloning the Ext JS Reactor repository from GitHub. This repository contains pre-configured boilerplate projects that simplify setting up a new project.
$ git clone https://github.com/sencha/extjs-reactor/2. Copy the Boilerplate Project
Once cloned, locate the boilerplate directory, which includes all essential configuration files with appropriate plugins. Copy this boilerplate setup to your project directory. For example:
$ cp -r extjs-reactor/packages/reactor-boilerplate ~/src/reactor-sampleThis command copies the reactor-boilerplate into a new directory named reactor-sample under ~/src.
3. Set Up the Project
With the boilerplate files in place, you now have the initial project structure, including:
- package.json: Specifies all package dependencies, so you can easily install them.
- webpack.config.json: A basic Webpack configuration that enables Ext JS Reactor functionality.
4. Integrate Ext JS
Next, you’ll need to link your copy of Ext JS to the project. You can do this in two ways:
- Option A: Copy or link your Ext JS source into the ext directory of your project.
- Option B: Alternatively, configure the Ext JS path by setting the sdk property in the ExtJSReactorWebpackPlugin within webpack.config.json to the absolute path of your Ext JS directory.
5. Install Dependencies
To download and install the project dependencies defined in package.json, navigate to the project directory and run:
$ npm install6. Explore the Project Structure
The boilerplate app includes:
- Source Code (src directory): Contains the core code, starting with the main application component App.js.
- Bootstrap Code (index.html and index.js): Initializes the project; these files are straightforward and easy to modify.
- App Component (App.js): The starting point for app-specific code, showcasing a simple use of an Ext JS grid component.
7. Launch the App
Now, you’re ready to run the app. Use the following command to start the development server:
$ npm startOpen your browser and navigate to http://localhost:8080/ to view the app in action. The initial setup includes a basic grid to demonstrate Ext JS within a React application.
8. Further Learning
To dive deeper into how Ext JS integrates with React code in this setup, review the App.js and other source files in the src directory. Each file is designed to be intuitive, providing a clear foundation to expand the app further.
Modifying an Existing React Project
To incorporate Ext JS components into an existing React project, follow this step-by-step guide:
Incorporating Ext JS components into a React application is straightforward with the help of the Webpack plugin provided by Sencha. This plugin ensures that Sencha Cmd is used during the build process to compile and optimize Ext JS components for the project.
2. Start with a Project
For example, suppose you have an open-source project, such as a simple Hacker News feed reader cloned from GitHub:
- Original Project: The starting code for your React application.
- Cloned Version: Your local copy where you’ll integrate Ext JS components.
3. Tagging Project Versions
To keep track of significant changes, you can use Git tags. Before starting the Ext JS integration, you may want to tag the initial version as v1.0 to represent the state of the app prior to adding Ext JS components.
$ git tag v1.0If any setup or minor adjustments are needed to ensure compatibility with typical React tooling, make these changes before tagging. This way, v1.0 reflects a solid base from which you’ll add Ext JS components.
4. Implement Key Changes for Ext JS Integration
Follow the steps specified in this document to make the necessary changes. You can view important adjustments in the project history. In upcoming sections, you’ll find explanations of specific updates, such as:
- Adding Ext JS components to enhance the app
- Configuring Webpack to work with Ext JS and React
- Leveraging the Sencha Cmd plugin for optimized builds
5. Accessing the Complete Change History
To see a detailed record of changes, access the Git repository’s history. You can check out specific tags with:
$ git checkout <tag>6. Viewing Differences Between Tags
To see a complete diff between versions, use the following command to compare tags (e.g., v1.0 and v1.1):
$ git diff v1.0 v1.1This command will show you all code changes made between the tagged versions, making it easy to follow the integration steps.
Initial State (Tag v1.0)
To see the initial state of the app, you can clone my repo and start the development server:
$ git clone https://github.com/jjarboe/extjs-reactor-hackernews
$ cd extjs-reactor-hackernews
$ git checkout v1.0
$ npm install
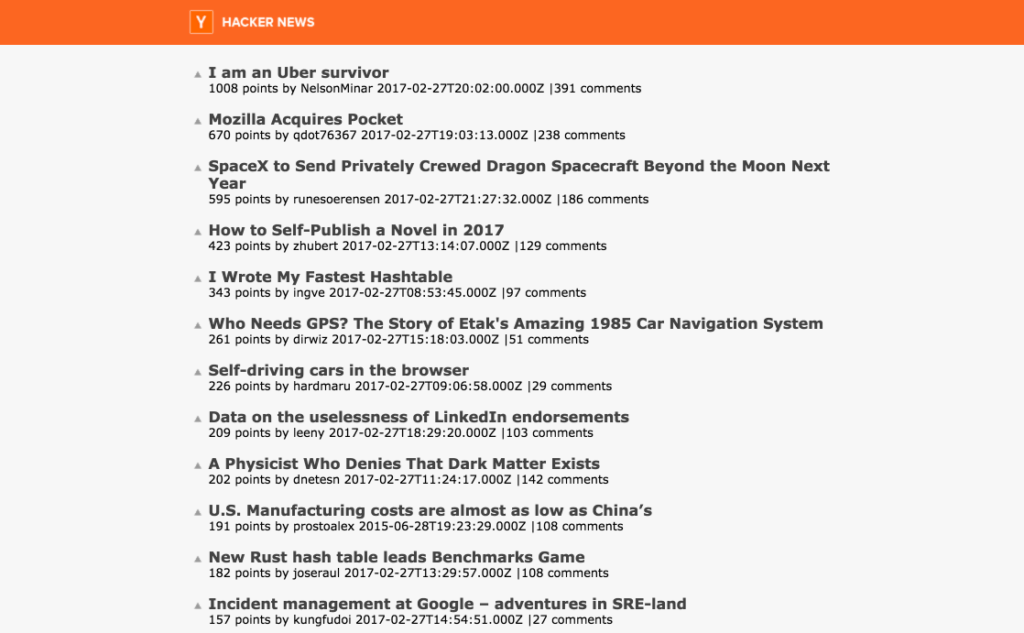
$ npm startOpen http://localhost:8080/ in your browser, and you should see a simple list of recent Hacker News articles.
Adding Ext JS Components (Tag v1.1)
To add Ext JS components to an existing React project, you’ll need to configure a few plugins and modify your code to integrate Ext JS elements. Follow these steps to get started:
1. Install Ext JS Plugins for Webpack and Babel
First, install the necessary plugins for Webpack and Babel.
Install the Webpack Plugin
This plugin is essential for incorporating Ext JS components into your project, ensuring that Sencha Cmd is used during the build process to handle and minimize Ext JS components.
$ npm install --save-dev @extjs/reactor-webpack-pluginInstall the Babel Plugin
For completeness, also install the Babel plugin:
$ npm install --save-dev @extjs/reactor-babel-pluginIf you’re working from a project previously set up (e.g., a v1.0 checkout), you may find these plugins already installed.
2. Configure Webpack for Ext JS
To use the Webpack plugin, add it to your Webpack configuration file (webpack.config.dev.js).
Import the Plugin
At the top of webpack.config.dev.js, add:
const ExtJSReactorWebpackPlugin = require('@extjs/reactor-webpack-plugin');Add Plugin Configuration
Next, add the ExtJSReactorWebpackPlugin to the plugins section of the configuration, specifying the SDK path and theme.
plugins: [
    new ExtJSReactorWebpackPlugin({
        sdk: 'ext',             // Path to your Ext JS installation
        theme: 'theme-material', // Theme to use (e.g., 'theme-material')
        packages: []             // Additional packages if needed
    }),
    ...
]
This configuration tells the plugin to use the Ext JS installation located in the ext directory and apply the Material Design theme. You can either:
- Copy or link your Ext JS installation into the ext directory.
- Modify the sdk path to point to your Ext JS installation directory.
3. Configure Babel for Ext JS
Add the @extjs/reactor-babel-plugin to your Babel configuration. This could be in a .babelrc file or directly in your Babel loader settings within the Webpack configuration.
4. Initialize Ext JS in Your React Application
To make Ext JS available at runtime, initialize it in your main application file. Suppose the app entry point is assets/js/app.js.
Import and Install Ext JS
At the top of the file, import and install Ext JS:
import { install } from '@extjs/reactor';
install();
Render the App with Ext JS
Ensure Ext JS is fully loaded before rendering the app by wrapping ReactDOM.render in Ext.onReady.
Ext.onReady(function() {
    ReactDOM.render(< App />, document.getElementById('app'));
});
5. Add Ext JS Grid Component
To enhance your application, replace a simple list with an Ext JS Grid. Assume the data is fetched and stored in the Posts component, located in assets/js/posts/index.html.
Import the Grid Component
At the top of Posts component file, import the Ext JS Grid:
import { Grid } from '@extjs/reactor/modern';Configure Data Store
Use an Ext JS Store to manage the data for the Grid. Initialize this in your component’s state, specifying fields and data handling.
return {
    store: Ext.create('Ext.data.Store', {
        fields: ['title', 'url'],
        data: [],
        proxy: {
            type: 'memory',
            reader: {
                type: 'json',
                rootProperty: 'posts'
            }
        }
    })
};
In the component’s success callback, load the fetched data into this store:
this.state.store.loadData(results.hits);
Here, we use a memory proxy, storing data on the client-side. Alternatively, for remote data, you could configure a JsonP proxy to fetch directly via Ext JS.
Render the Grid Component
Update the render method to display the data in a Grid component:
render: function() {
return (
< Grid columns={[ { text: 'Title', dataIndex: 'title', flex: 1 } ]} height={750} width="100%" store={this.state.store} />
);
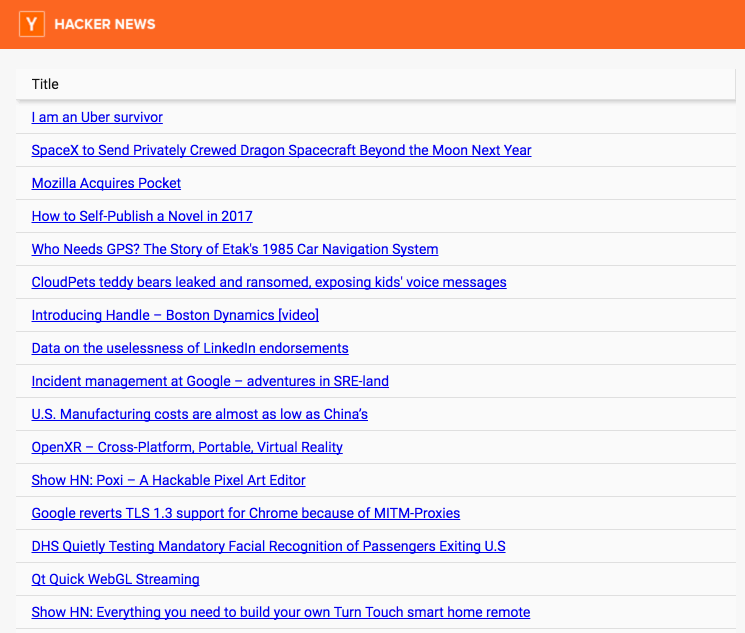
}In this example, we define a single column in the Grid to display the article title. The store prop references the state store with loaded data, and the Grid will handle rendering each record as a row.
6. Start the Application
With the Ext JS integration complete, start the development server:
$ npm startNavigate to http://localhost:8080/ to view the enhanced application. You should see the list of articles in an Ext JS Grid component.
This setup provides a powerful, responsive interface, leveraging Ext JS within your React app for a richer, more dynamic experience.
Wrapping Up: Adding Ext JS Components to React
That’s it! Adding robust, full-featured Ext JS components to your React project is as straightforward as:
Integrating the Plugins
Include the ReExt tool into your build process.
Importing Components
Bring in the specific Ext JS components you need.
Configuring and Rendering
Use familiar React patterns to configure and render the components with the options you want.
The configuration options for Ext JS components align naturally with React props, allowing you to nest and compose components just as you would with any other React component. Plus, because you’re leveraging standard Ext JS components, you gain access to additional productivity tools from Sencha.
For instance, Sencha Themer can help you quickly design a cohesive look and feel for your app by customizing the Ext JS components with a consistent theme.
Next Steps
In Part 2 of this series, we’ll explore more advanced features by:
- Enhancing the grid to display additional information
- Adding navigation and visualization components to enrich user interactions
If there’s a specific component you’re interested in learning about, feel free to let us know in the comments. In the meantime, try out Ext JS Reactor on GitHub and share your feedback. We greatly appreciate the input from the community!
Happy coding!
FAQs
1. How do I integrate Ext JS components into my existing React application?
Install Ext JS plugins, configure Webpack, initialize Ext JS in your app, and render Ext JS components within your React components.
2. Do I need to modify my existing React environment to use Ext JS components?
No, integrating Ext JS components requires adding plugins and configurations without overhauling your existing React setup.
3. Can I customize the appearance of Ext JS components in my React app?
Yes, use tools like Sencha Themer to define cohesive and consistent themes for Ext JS components in your React application.
4. Are all Ext JS components compatible with React?
Yes, Ext JS offers a comprehensive set of components compatible with React through tools like ExtReact and ReExt.
5. Where can I find examples of integrating Ext JS with React?
Explore practical examples and boilerplate projects on GitHub.
Sign Up for free at Sencha ReExt to create efficient React applications.


Latest Content

JS Days Is Back: A Free Virtual Conference for JavaScript Developers
Sencha is bringing back JS Days, a free, two-day online conference for JavaScript developers. Dates:…
July 2, 2026

What Is DORA? A Complete Guide to the EU's Digital Operational Resilience Act (2026)
Last Updated: June 2026 The Digital Operational Resilience Act (DORA) is one of the most…
June 17, 2026

Top 8 Best Practices for Enterprise Software Development in 2026
Enterprise software development in 2026 demands a different approach than consumer application development. Enterprise teams…
June 3, 2026


