


 Ask Sencha AI
Ext JS Dynamic Forms: Hands-On Guide to Create Data Forms
April 23, 2024
8482 Views
Get a summary of this article:
Dynamic forms are changing the online world these days. Ext JS can help you integrate such forms into your website. It has scalable and excellent reusable components that help us achieve dynamic forms. Ext JS has a strong foundation for creating interactive user interfaces. Hence, it has become popular for developers looking for modern tools to build desktop apps.
Dynamic forms can add value to your website. In other words, they make it easier for users to interact with your website. Therefore, you can achieve a highly user-friendly website. In the coming sections of this blog, we will show you how to build dynamic forms with Ext JS. Don’t worry—we will keep things simple. Let’s begin.

What is Ext JS?
Ext JS helps developers build powerful desktop-based applications. This JavaScript framework is more suitable for complex applications like Enterprise Application Development. When using Ext JS, we use different techniques, such as Ajax, DHTML, and DOM scripting.
Sencha developed Ext JS. Since its first version, Sencha Ext JS has launched many versions after that. Ext JS 7.7 is the latest version.
Ext JS is popular for containing a rich component library. The best part? It has amazing cross-platform and cross-browser compatibility. Moreover, it has MVC architecture. This means developers can build complex applications using pre-built components for user interfaces.
Also Read: How to Create React App Typescript?
How Do You Set Up Your Development Environment?
Before getting started with any framework, it is always recommended to check their documentation. This case also applies to Ext JS applications.
If you are a trial customer, install the Ext JS 30-day trial package first. You can get this project readily as a public npm. The below command helps you install the latest version of Ext JS:
npm install -g @sencha/ext-genFor ACTIVE Customers:
Ext JS and its related packages are in Sencha’s private npm registry. Use this command to login to the registry:
$ npm login --registry=https://npm.sencha.com/ --scope=@senchaThen, install it:
$ npm install -g @sencha/ext-genNext, use this npm command to create a new project with a simple homepage and grid:
ext-gen app -a -t moderndesktop -n ModernAppThen, explore your new application by navigating to your project directory:
cd ./modern-appStart exploring your project:
npm startCongratulations! You’ve successfully built an application using Ext JS!
How Do You Build Basic Form Components?
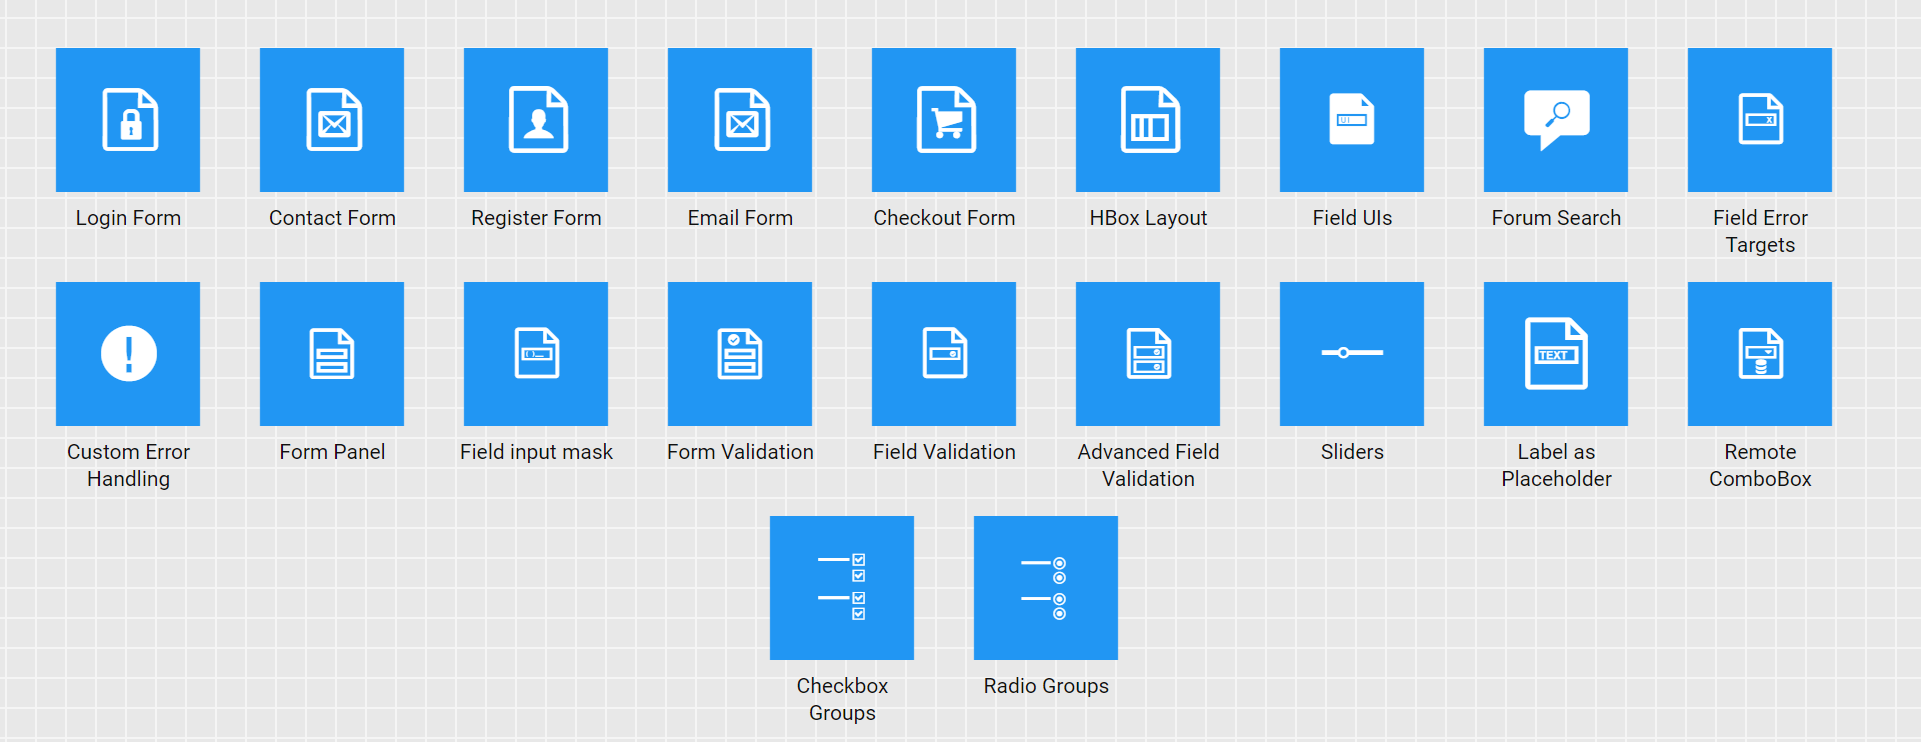
Here are the forms offered by Sencha:
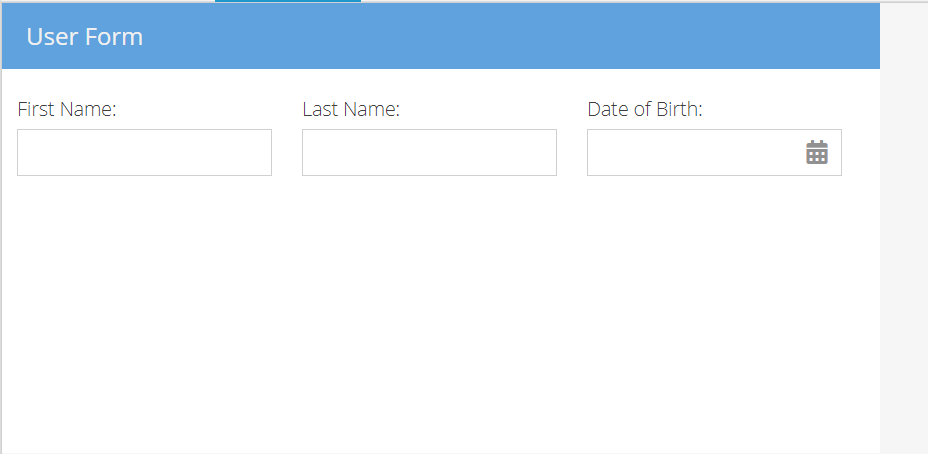
Here is the code example to build a simple login form:
Ext.create('Ext.form.Panel', {
    renderTo: document.body,
    title: 'User Form',
    height: 350,
    width: 300,
    bodyPadding: 10,
    defaultType: 'textfield',
    items: [
        {
            fieldLabel: 'First Name',
            name: 'firstName'
        },
        {
            fieldLabel: 'Last Name',
            name: 'lastName'
        },
        {
            xtype: 'datefield',
            fieldLabel: 'Date of Birth',
            name: 'birthDate'
        }
    ]
});
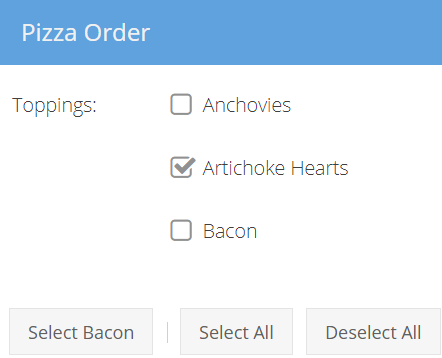
Adding a Checkbox
Here is how you add a checkbox:
Ext.create('Ext.form.Panel', {
    bodyPadding: 10,
    width: 300,
    title: 'Pizza Order',
    items: [
        {
            xtype: 'fieldcontainer',
            fieldLabel: 'Toppings',
            defaultType: 'checkboxfield',
            items: [
                {
                    boxLabel  : 'Anchovies',
                    name      : 'topping',
                    inputValue: '1',
                    id        : 'checkbox1'
                }, {
                    boxLabel  : 'Artichoke Hearts',
                    name      : 'topping',
                    inputValue: '2',
                    checked   : true,
                    id        : 'checkbox2'
                }, {
                    boxLabel  : 'Bacon',
                    name      : 'topping',
                    inputValue: '3',
                    id        : 'checkbox3'
                }
            ]
        }
    ],
    bbar: [
        {
            text: 'Select Bacon',
            handler: function() {
                Ext.getCmp('checkbox3').setValue(true);
            }
        },
        '-',
        {
            text: 'Select All',
            handler: function() {
                Ext.getCmp('checkbox1').setValue(true);
                Ext.getCmp('checkbox2').setValue(true);
                Ext.getCmp('checkbox3').setValue(true);
            }
        },
        {
            text: 'Deselect All',
            handler: function() {
                Ext.getCmp('checkbox1').setValue(false);
                Ext.getCmp('checkbox2').setValue(false);
                Ext.getCmp('checkbox3').setValue(false);
            }
        }
    ],
    renderTo: Ext.getBody()
});
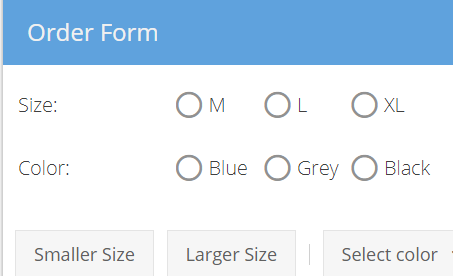
Adding Radio Buttons
Here is an example to add radio buttons:
Ext.create('Ext.form.Panel', {
    title      : 'Order Form',
    width      : 300,
    bodyPadding: 10,
    renderTo   : Ext.getBody(),
    items: [
        {
            xtype      : 'fieldcontainer',
            fieldLabel : 'Size',
            defaultType: 'radiofield',
            defaults: {
                flex: 1
            },
            layout: 'hbox',
            items: [
                {
                    boxLabel  : 'M',
                    name      : 'size',
                    inputValue: 'm',
                    id        : 'radio1'
                }, {
                    boxLabel  : 'L',
                    name      : 'size',
                    inputValue: 'l',
                    id        : 'radio2'
                }, {
                    boxLabel  : 'XL',
                    name      : 'size',
                    inputValue: 'xl',
                    id        : 'radio3'
                }
            ]
        },
        {
            xtype      : 'fieldcontainer',
            fieldLabel : 'Color',
            defaultType: 'radiofield',
            defaults: {
                flex: 1
            },
            layout: 'hbox',
            items: [
                {
                    boxLabel  : 'Blue',
                    name      : 'color',
                    inputValue: 'blue',
                    id        : 'radio4'
                }, {
                    boxLabel  : 'Grey',
                    name      : 'color',
                    inputValue: 'grey',
                    id        : 'radio5'
                }, {
                    boxLabel  : 'Black',
                    name      : 'color',
                    inputValue: 'black',
                    id        : 'radio6'
                }
            ]
        }
    ],
    bbar: [
        {
            text: 'Smaller Size',
            handler: function() {
                var radio1 = Ext.getCmp('radio1'),
                    radio2 = Ext.getCmp('radio2'),
                    radio3 = Ext.getCmp('radio3');

                //if L is selected, change to M
                if (radio2.getValue()) {
                    radio1.setValue(true);
                    return;
                }

                //if XL is selected, change to L
                if (radio3.getValue()) {
                    radio2.setValue(true);
                    return;
                }

                //if nothing is set, set size to S
                radio1.setValue(true);
            }
        },
        {
            text: 'Larger Size',
            handler: function() {
                var radio1 = Ext.getCmp('radio1'),
                    radio2 = Ext.getCmp('radio2'),
                    radio3 = Ext.getCmp('radio3');

                //if M is selected, change to L
                if (radio1.getValue()) {
                    radio2.setValue(true);
                    return;
                }

                //if L is selected, change to XL
                if (radio2.getValue()) {
                    radio3.setValue(true);
                    return;
                }

                //if nothing is set, set size to XL
                radio3.setValue(true);
            }
        },
        '-',
        {
            text: 'Select color',
            menu: {
                indent: false,
                items: [
                    {
                        text: 'Blue',
                        handler: function() {
                            var radio = Ext.getCmp('radio4');
                            radio.setValue(true);
                        }
                    },
                    {
                        text: 'Grey',
                        handler: function() {
                            var radio = Ext.getCmp('radio5');
                            radio.setValue(true);
                        }
                    },
                    {
                        text: 'Black',
                        handler: function() {
                            var radio = Ext.getCmp('radio6');
                            radio.setValue(true);
                        }
                    }
                ]
            }
        }
    ]
});
Contact our support if you have questions about dynamic forms using Ext JS.
How Do You Add Interactivity with Dynamic Form Controls?
You can add interactivity to your dynamic form controls by using the combo boxes as under:
// The data store containing the list of states
var states = Ext.create('Ext.data.Store', {
    fields: ['abbr', 'name'],
    data : [
        {"abbr":"AL", "name":"Alabama"},
        {"abbr":"AK", "name":"Alaska"},
        {"abbr":"AZ", "name":"Arizona"}
    ]
});

// Create the combo box, attached to the states data store
Ext.create('Ext.form.ComboBox', {
    fieldLabel: 'Choose State',
    store: states,
    queryMode: 'local',
    displayField: 'name',
    valueField: 'abbr',
    renderTo: Ext.getBody()
});
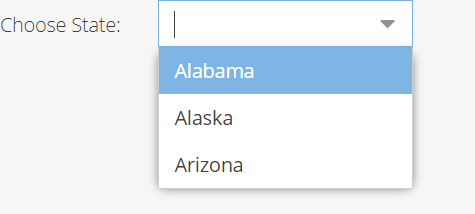
Note: The combo boxes are easily customizable UI widgets through Ext JS
What is Data Binding and Form Submission in Ext JS?
Data binding is like a helpful link between a website’s appearance and what can change on it. It’s like a magic connection that keeps the website and data together smoothly. So, when something changes in the data, like a price or a name, the website automatically shows that change without you having to do anything.
There’s a cool feature called two-way data binding. This means the data is updated when you do something on the website, like clicking a button or typing in a box. When the data changes, the website is instantly updated. This makes your website more interactive and responsive. Here, we discuss data submission using forms.
Form Data Submission
Here is the basic form submission code example:
Ext.create('Ext.form.Panel', {

    ...

    url: 'add_user',

    items: [

        ...

    ]

});
When we want to submit form data to a specific URL, here is how we do it:
Ext.create('Ext.form.Panel', {
    ...
    url: 'add_user',
    items: [
        ...
    ],
    buttons: [
        {
            text: 'Submit',
            handler: function() {
                var form = this.up('form'); // get the form panel
                if (form.isValid()) { // make sure the form contains valid data before submitting
                    form.submit({
                        success: function(form, action) {
                           Ext.Msg.alert('Success', action.result.msg);
                        },
                        failure: function(form, action) {
                            Ext.Msg.alert('Failed', action.result.msg);
                        }
                    });
                } else { // display error alert if the data is invalid
                    Ext.Msg.alert('Invalid Data', 'Please correct form errors.')
                }
            }
        }
    ]
});
Also Read: JS Frameworks: Expectations vs. Reality
What is an Advanced Form Customization?
One of the advanced form customizations in forms is enabled through HBOX layout as under
Ext.create('Ext.form.Panel', {
    renderTo: document.body,
    title: 'User Form',
    height: 300,
    width: 585,
    defaults: {
        xtype: 'textfield',
        labelAlign: 'top',
        padding: 10
    },
    layout: 'hbox',
    items: [
        {
            fieldLabel: 'First Name',
            name: 'firstName'
        },
        {
            fieldLabel: 'Last Name',
            name: 'lastName'
        },
        {
            xtype: 'datefield',
            fieldLabel: 'Date of Birth',
            name: 'birthDate'
        }
    ]
});
How Do You Implement Form Validations?
There are two types of form validation to implement using Sencha:
- Built-in validation
- Custom validation
This is how built-in form validation works. It shows a red underline or a pop-up message.
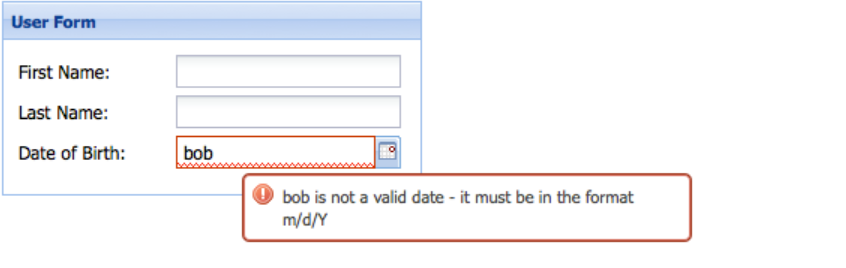
Sometimes, you need to check if the data fits a specific pattern.
For example, if you want to ensure a time is entered correctly, like “12:34 PM”, you can use a pattern to check it.
Ext JS makes this easy and allows you to reuse these checks for other fields. This helps keep your code organized and saves time.
{
    xtype: 'datefield',
    fieldLabel: 'Date of Birth',
    name: 'birthDate',
    msgTarget: 'under', // location of the error message
    invalidText: '"{0}" bad. "{1}" good.' // custom error message text
}
Here is an example of code that validates time for a single field:
{
    xtype: 'textfield',
    fieldLabel: 'Last Login Time',
    name: 'loginTime',
    regex: /^([1-9]|1[0-9]):([0-5][0-9])(\sm)$/i,
    maskRe: /[\d\s:amp]/i,
    invalidText: 'Not a valid time.  Must be in the format "12:34 PM".'
}
Here is custom time validator:
// custom Vtype for vtype:'time'
var timeTest = /^([1-9]|1[0-9]):([0-5][0-9])(\sm)$/i;
Ext.apply(Ext.form.field.VTypes, {
    //  vtype validation function
    time: function(val, field) {
        return timeTest.test(val);
    },
    // vtype Text property: The error text to display when the validation function returns false
    timeText: 'Not a valid time.  Must be in the format "12:34 PM".',
    // vtype Mask property: The keystroke filter mask
    timeMask: /[\d\s:amp]/i
});
Want to integrate Sencha Ext JS forms? Contact our sales team today!
How Do You Create Dynamic Form Wizards?
Creating dynamic form wizards in Ext JS involves utilizing wizard layouts. It helps us to structure the multi-step process.
Here’s a basic example of how you might set up a wizard with two steps:
Ext.create('Ext.panel.Panel', {

    renderTo: Ext.getBody(),

    title: 'Form Wizard',

    layout: 'card',

    items: [{

        xtype: 'form',

        title: 'Step 1',

        items: [{

            xtype: 'textfield',

            fieldLabel: 'Name'

        }]

    }, {

        xtype: 'form',

        title: 'Step 2',

        items: [{

            xtype: 'textfield',

            fieldLabel: 'Email'

        }]

    }],

    buttons: [{

        text: 'Previous',

        handler: function() {

            // Navigate to the previous step

        }

    }, {

        text: 'Next',

        handler: function() {

            // Navigate to the next step

        }

    }]

});
How Do You Optimize Form Performance?
Here are some techniques to optimize form performance:
- Lazy loading to load the forms only when they are needed.
- Virtual scrolling for large datasets.
- Minimizing DOM manipulations.
- Using Ext JS profiling tools to resolve bottlenecks.
- Using Sencha Inspector to figure out the issues.
How Do You Perform Testing and Debugging in Ext JS Dynamic Forms?
Testing and debugging of dynamic forms require a systematic approach for Ext JS. It helps us maintain performance and functionality. You can use the Jasmine or Sencha Test to perform unit testing for dynamic forms. It can help you verify the individual components.
Moreover, Sencha testing utilities are also helpful for end-to-end testing.
Browser developer tools are also helpful for debugging. They provide insights into network requests and DOM manipulation. You can now use Sencha Inspector to debug issues and visualize data flow. You can also track form behaviours using custom or console logging.
Conclusion
The above blog post discussed creating beautiful, dynamic forms using Ext JS. We showed the code examples and the output to create these forms. Ext JS can help you build forms that are not only scalable but also good-looking. Besides, it also gives you access to tools like Sencha Inspector and Sencha CMD to maintain the performance of your forms.
Ext JS Dynamic Forms: FAQs
What Are the Dynamic Forms?
Dynamic forms change based on user inputs. It helps users interact with the forms in real-time.
Is Ext JS Suitable for Building Responsive Forms for Mobile Devices?
Yes. It comes with cross-platform compatibility, making building responsive layout forms easier.
What Are Some Best Practices for Optimizing Performance When Using Ext JS Forms?
Sencha profiling tools are the best way to optimize the performance when using forms.
How Can I Handle Form Data Persistence and State Management Across User Sessions in Ext JS Applications?
You can handle form data persistence and state management using Sencha session management or local storage.
Why are dynamic forms important in modern apps?
Dynamic forms improve user experience by showing only relevant fields, reduce input errors through validation, and speed up workflows—critical for enterprise and customer-facing applications.
How does Ext JS make form building easier?
Ext JS comes with pre-built UI components, data binding, and validation tools. Developers can quickly assemble forms without writing everything from scratch, saving time and ensuring consistency.
Can dynamic forms handle real-time data?
Yes. With data binding and live updates, forms can display or validate information in real-time—for example, auto-checking username availability or updating prices based on selections.
What industries use dynamic forms the most?
Dynamic forms are widely used in finance, healthcare, e-commerce, HR, and government apps—anywhere data collection needs to be flexible, validated, and user-friendly.
Do dynamic forms work on mobile devices?
Modern frameworks like Ext JS ensure that forms are responsive. Fields, layouts, and controls adapt automatically to mobile, tablet, and desktop screens.
What’s the difference between static and dynamic forms?
- Static forms: Fixed fields that never change.
- Dynamic forms: Fields that show, hide, or change based on user input, data, or logic—creating a smoother experience.

 0
0
 2
2
Latest Content

Bridge the Gap: Integrating Modern NPM Packages with Ext JS
In the modern web development landscape, the ability to leverage existing solutions is a superpower.…
April 29, 2026

Upgrading Your Ext JS 7.x Application to Ext JS 8.0
This guide covers the technical steps for upgrading Ext JS 7.x applications to 8.0. Upgrading…
April 23, 2026

Ext JS 6.x to Ext JS 8.0: Technical Upgrade Guide
This guide covers the technical steps for upgrading Ext JS 6.x applications to 8.0. Upgrading…
April 23, 2026


