


 Ask Sencha AI
Creating Installable Desktop Applications with Ext JS and Electron
September 27, 2016
5358 Views
Get a summary of this article:

Even seasoned Ext JS developers are surprised to learn that Ext JS can be used to create executable desktop applications such as.exe or.app files (which can be run on Windows, macOS, or Linux). Sencha Themer, Sencha Architect, Sencha Inspector and Sencha Test are, in fact, executable desktop applications built with Ext JS and packaged with Electron. It’s even possible to upload and sell Ext JS applications, as well as package them for the Windows Store and Mac App Store using Electron. This article will walk you through the steps of creating and packaging an Ext JS 6 starter application, as well as how a Javascript Web Framework can help when creating installable desktop applications with Electron.
In order to make an Ext JS application executable, you’ll need to build the application using Sencha Cmd and then package the application with Electron. The principles for packaging an HTML5 mobile app using Apache Cordova or Adobe PhoneGap are very similar to those for packaging an HTML5 application for desktops. Currently, two desktop packaging frameworks are gaining traction: Electron, which was created by Github, and NW.js which was created by Intel and GnorTech. Both of these technologies are available under an open-source MIT license, so you can use them for free. Although each technology has its own set of advantages, I will only focus on Electron and Ext JS in this article. Electron is currently more popular than NW.js even though it’s a newer technology.
UPDATE: Watch the SenchaCon video on Advanced Techniques for Building Native Desktop Apps with Ext JS and Electron
Electron – A First Look
In short, Electron is a runtime which is used to create desktop HTML5 applications. Under the hood, it’s running Chromium Content Module and Node.js runtimes. If your Ext JS webapp works in Chromium (an open source version of Google Chrome), it will also work within Electron. The impact of your Ext JS web app working in Chromium is that there is no need to test your applications on older versions of Internet Explorer, which lack modern HTML5 capabilities. Electron’s website lists numerous popular desktop applications you have probably used without realizing they are in fact an HTML5 application. Using Electron’s JavaScript APIs, you’ll be able to access native operating system APIs including features like clipboard, native application menus, context menus, notification, file system, and much more.
Electron Fundamentals
Electron works by launching a Main Process which usually launches one or more Render Processes. The Main Process is responsible for lifecycle events of an application. These include starting, exiting, and communicating with other native operating system APIs. The Render Process is created by the Main Process and can be used to load webpages. Each process is run in its own thread.
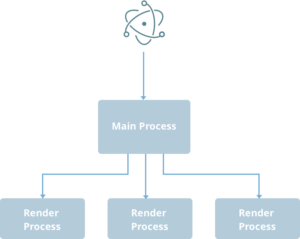
Figure 1: Electron launches the Main Process. The Main Process can create multiple Render Processes.
Because we’re using Node.js, we need to create a manifest file called package.json. This file helps Node.js understand various dependencies, which are included in the packaging process.
Let’s Package an Ext JS Starter App Together
Using Sencha Cmd, it’s possible to build a simple starter application with one command. In this section, we’ll first create a starter application using Sencha Cmd, and then package our simple starter application into an executable by using Electron.
As a prerequisite, you need to download and install Sencha Cmd and create a Sencha Cmd Workspace with the Ext JS framework. See the Installation instructions to create a Sencha Cmd Workspace. Additionally, you need to install Node.js.
Let’s first create the Ext JS starter application. You can do so with one command from within your Sencha Cmd Workspace.
sencha -sdk /path/to/ExtSDK generate app -classic StarterApp ./starterapp
Once your Starter App is created, you can run the following command to build your application for development within the starterapp directory:
sencha app watch
The command above will also enable you to view the Starter App by visiting the following link in your web browser: http://locahost:1841/starterapp.
After you have viewed the Starter App in your browser and you’re confident that the web app is functioning, open a second terminal window and go the starterapp directory.
Next, we’ll build the application using Sencha Cmd from the starterapp directory. The following command will create the electron/app subdirectories and place the minimized version of the Ext JS code into the electron/app subdirectory:
sencha app build -des electron/app
The flag -des can be avoided if the “output” property is updated in the app.json to build the application in the electron/app directory.
At this point, your directory structure should look like Figure 2.
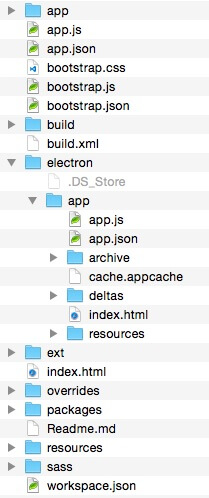
Figure 2: An electron/app subdirectory is created by the sencha app build command.
Next, we need to create a manifest file called package.json in the starterapp/electron subdirectory. I have already created a sample package.json file and configured it to generate executable binaries for all supported operating systems. If you are on macOS and only wish to package your application for macOS, use the following sample package.json file instead. Download the file and place it in the starterapp/electron subdirectory.
Next, we need to create the file that contains our Main Process. Let’s call this file main.js and place it into our starterapp/electron/app subdirectory. I have created a basic Main Process file; download it and place it in the starterapp/electron/app subdirectory.
Next, we’ll need to install Electron and Electron Packager into our project. Run the following two commands in the starterapp/electron directory:
npm install electron-prebuilt -save
npm install electron-packager --save-dev
After running the command above, you’ll have a new subdirectory called node_modules located in the starterapp/electron subdirectory.
To start your Electron application, type in the following in the starterapp/electron directory:
npm start
Now, you’re ready to write your own Ext JS 6 code. Each time you make changes in your Ext JS application, you’ll need to re-build, via Sencha Cmd, and re-run the npm start command. If you need to access Chrome Inspector, uncomment line 14 from the starterapp/electron/app/main.js file.
Once you’re done coding your application, you’ll need to package your application to produce an executable binary. If you’re packaging on macOS or Linux and want to create a Windows executable, you need to install Wine prior to packing your application. Wine assists in packaging Windows apps on macOS and Linux. Note: the process to install Wine on macOS can take around thirty minutes. If you’re on macOS and don’t wish to package for Windows and create an .exe binary, make sure you’re using the correct package.json file as described earlier, so you can still create a binary for Linux and macOS. If you already have MacPorts installed, you can use this command to install Wine in one step:
sudo port install wine
Next, to begin packaging your application, run the following command in the starterapp/electron directory:
npm run-script package
The command above will result in the application binaries being placed into a newly created starterapp/electron/dist subdirectory. In this subdirectory, you’ll find your newly created binaries for Linux, Windows, and macOS.
Next Steps
Ext JS and Electron work well together because Ext JS provides all of the components you’ll need to create a beautiful application, and Electron helps you package your Ext JS application and gives you access to native features.
Now that you’re done packaging your Ext JS Starter App, you can learn how to access more native features in Electron. Be sure to check out the Electron docs. Additionally, there are two Manning books about to be published that are available right now via early access on Manning’s website. Plus, at SenchaCon, we’ll have a session on Electron and Ext JS, where we’ll discuss more details about how these frameworks can be integrated to create desktop applications.
 1
1

Latest Content
What we're building next: Sencha 2026/2027 Roadmap Update
In this Sencha 2026/2027 roadmap update, you’ll find a detailed summary of what we’ve planned…
July 23, 2026

12 Best Application Development Software Tools for Enterprise Teams in 2026
Enterprise teams in 2026 build applications using a stack of complementary application development software tools…
July 16, 2026

7 Best React Data Grids in 2026: Performance, Features, and Pricing Compared
React data grid selection significantly affects enterprise application development outcomes because grids are often the…
July 16, 2026


