


 Ask Sencha AI
Getting Started with Sencha Touch 2: Build a Weather Utility App (Part 1)
November 8, 2013
1682 Views
 In this three-part Sencha Touch tutorial, you will build the Do I need my Umbrella app, a simple utility app that loads weather information from a web service — worldweatheronline.com. Based on weather codes, this app can predict if you need your umbrella or not.
In this tutorial, you will start with coding the app. The next tutorials will focus on creating a cool Sencha Touch theme and how to port your app to a native app with PhoneGap.
This extjs tutorial for beginners requires:
- Sencha Touch 2.3 or higher
- Sencha Cmd 4.x
- A modern browser
- Editor
Here are some additional resources:
You can see the app itself up and running here.
The final code can be downloaded here.
There are some tutorial goodies you will need — controller and functions.
How do I generate and run the demo application?
Let’s start by creating a sencha folder somewhere on your hard disk. Download the Sencha Touch 2.3 framework and extract it into the newly created sencha folder. Now, create the folder for your app, I’ve called it dinmu since that is shorter than the name “DoINeedMyUmbrella” but it’s up to you.
Now, open your command line (MS-Dos Prompt or Mac OS X Terminal), navigate to the Sencha framework folder: (cd sencha/touch-2.3.x folder) and run the following command to generate your Sencha Touch MVC folder structure:
sencha generate app -name Dinmu -path ../dinmu
This command generates the full MVC structure for your application: Do I need my Umbrella. It takes the namespace Dinmu, to prefix all your classes. Review the folder structure it has created.
Now it’s time to start your web server via the command line — use the path to your sencha folder. (If you would rather use your own Apache web server, you are free to start it and skip this step.) On Mac OS X, you might need permissions for executing the next command: if you run into permission errors, prefix the above command with sudo.
sencha fs web -p 80 start -map /path/to/sencha/folder/
This will start your built-in Jetty web server. You need your CLI window open to keep the server running, so it makes sense to open a new CLI window for the next commands.
Test your generated Sencha Touch app. Open your modern browser (such as Google Chrome or Safari) and run: http://localhost/dinmu. You should see the Sencha demo app interface with a bottom tab panel and two demo slides:

What is the Data Package?
In the next steps, you will generate the model which will define your data. There are a couple of settings you want to save in your app: id, city, country, units and geolocation. You will define these data settings as model fields. Sencha Cmd can scaffold this model for you. Run the following command from the dinmu folder on the command line:
sencha generate model Setting id,city,country,units,geo:boolean
This command generated the model for your application. It takes the classname Setting and one String with all the field names to define all the different fields. Let’s review your folder structure again.
Open app/model/Setting.js with your editor. Notice the namespace Dinmu.model.Setting is equal to app/model/Setting.js. This is your implementation of the Setting model; Sencha Cmd defined a Setting model class for you. It extends a model implementation from the Sencha Touch framework: Ext.data.Model and it contains all the fields and field types.
The field id, will define id’s for every model record in your application. To have it behave as a unique id, you will need to configure it. Before the fields array, configure an idProperty and an identifier.
idProperty: ‘id’,
identifier: ‘uuid’,
The logic for these unique IDs are in a Sencha class that we need to “import” into our app. We can use a requires for that, this requires the class Ext.data.identifier.Uuid.
requires: ['Ext.data.identifier.Uuid'],
The next step is to create some validations for our model. After the fields array, create a validations array. The array contains validation objects to validate whether the data for these fields is present:
validations: [{
type: ‘presence’,
field: ‘city’,
message: “Please provide a city.”
}, {
type: ‘presence’,
field: ‘country’,
message: “Please provide a country.”
}
],
Since we want to save the local settings data to the device, the last step is to add a client proxy.
We will use localstorage. The localstorage proxy will make sure that all the data persists into the browser localstorage. Define the proxy object directly after the validations array:
proxy: {
type: ‘localstorage’,
id: ‘weathersettings’
}
Where are the View Components?
The standard tabpanel interface that Sencha Cmd generates looks good, but it’s not what you need for a utility app. The Do I need my Umbrella app will need a carousel interface.
Open the code of app/view/Main.js in your IDE or text editor.
The current implementation of Dinmu.view.Main extends from the Sencha Touch Ext.tab.Panel class. It has a tabBarPosition property to add the tabs to the screen bottom.
We don’t need it, so remove tabBarPosition:bottom and change the extend to Ext.Carousel, to extend from the Sencha Touch Carousel class. From here, you can open your browser and run: http://localhost/dinmu. You should see the generated Sencha demo app. The tabpanel interface is replaced by a carousel interface. You can slide the views horizontally.
Let’s remove more default components. We won’t need the demo video, so let’s remove the Ext.Video from the requires array. We can also empty the items array, since we will replace it with two new items.
The first item object (container by default) has only the html property. This can be set to a placeholder text: Settings Form so you can code this later. The second item object has a property itemId: ‘mainview’ and a cls property (for styling) set to the value: textview. Also add a direction property, which will set the direction of the Carousel to ‘vertical’.
Ext.define(‘Dinmu.view.Main’, {
extend: ‘Ext.Carousel’,
xtype: ‘main’,
requires: [
‘Ext.TitleBar’
],
config: {
direction: ‘vertical’,
items: [{
html: ‘Settings Form’
},{
itemId: ‘mainview’,
cls: ‘textview’
}]
}
});
Viewed in the browser, the app looks pretty basic. Let’s add a top titlebar and a bottom toolbar. Before the Settings Form object, create a new object. This object will get the xtype: ‘titlebar’ to add a new instance of Ext.TitleBar to the Viewport (the screen). Set a class name on the titlebar with the CSS class property: cls: ‘title’. Set a docked: ‘top’ property to stick this titlebar to the top of the screen. Set the title to: Do I need my Umbrella? with the title property:
{
xtype: ‘titlebar’,
cls: ‘title’,
docked: ‘top’,
title: ‘Do I need my Umbrella?’
},
You will do the same for the bottom toolbar. This time the xtype is not titlebar but toolbar. The cls can be set to footer. Dock it to the bottom of the screen. Instead of the title property, the toolbar needs an html property. Set this to some copyright string. We will add an ui property which is set to light to create a lighter look and feel. Don’t forget to add Ext.Toolbar to the requires array in the top of the file, so the correct framework class will be loaded into the memory.
{
xtype: ‘toolbar’,
cls: ‘footer’,
ui: ‘light’,
docked: ‘bottom’,
html: ‘Powered by © Sencha Touch’
},
The next step is to create some buttons in the top titlebar.
The titlebar should contain an items array, which contains two buttons. A back button, which will be displayed when you are on the settings screen, and a settings button which will be shown on the default screen. You don’t need to set the xtype to button, the default item of an Ext.TitleBar is a button. The back button, is by default hidden and it is left aligned in the titlebar. The settings button, shows an icon of a settings gear.
Confirm your code looks like this:
Ext.define(‘Dinmu.view.Main’, {
extend: ‘Ext.Carousel’,
xtype: ‘main’,
requires: [
‘Ext.TitleBar’,
‘Ext.Toolbar’
],
config: {
direction: ‘vertical’,
items: [
{
xtype: ‘titlebar’,
cls: ‘title’,
docked: ‘top’,
title: ‘Do I need my Umbrella?’,
items: [{
cls: ‘back’,
hidden: true,
ui: ‘back’,
action: ‘back’,
align: ‘left’,
text: ‘back’
},
{
iconCls: ‘settings’,
action: ‘settings’,
ui: ‘plain’,
align: ‘right’
}]
},
{
html: ‘Settings Form’
},{
itemId: ‘mainview’,
cls: ‘textview’
},
{
xtype: ‘toolbar’,
cls: ‘footer’,
ui: ‘light’,
docked: ‘bottom’,
html: ‘Powered by © Sencha Touch’
}]
}
});
Open your browser and run: http://localhost/dinmu. You should see a button with a gear in the right corner of the Ext.TitleBar.
How are Forms setup?
Now, we can start with creating a form. You know what? Let’s generate this too.
Navigate to the dinmu folder on the command line and run the following to generate your Sencha Touch form:
sencha generate form SettingsView geo:toggle,units:select,city,country
Review the form class that has been scaffolded. Open app/view/SettingsView. The Dinmu.view.SettingsView class has an xtype set to settingsview. You can assign custom made classes to item arrays with the xtype property.
So let’s do so. Open Dinmu.view.Main (app/view/Main.js), find the settings item in your code. By default, if you don’t specify its xtype is set to container. You will need to refer to the new xtype: settingsview, so add xtype: ‘settingsview’ to the Main view code. You don’t need the placeholder html string anymore. Remove the html: settings property. Also don’t forget to add Dinmu.view.SettingsView to the requires array to make sure this class is loaded in memory.
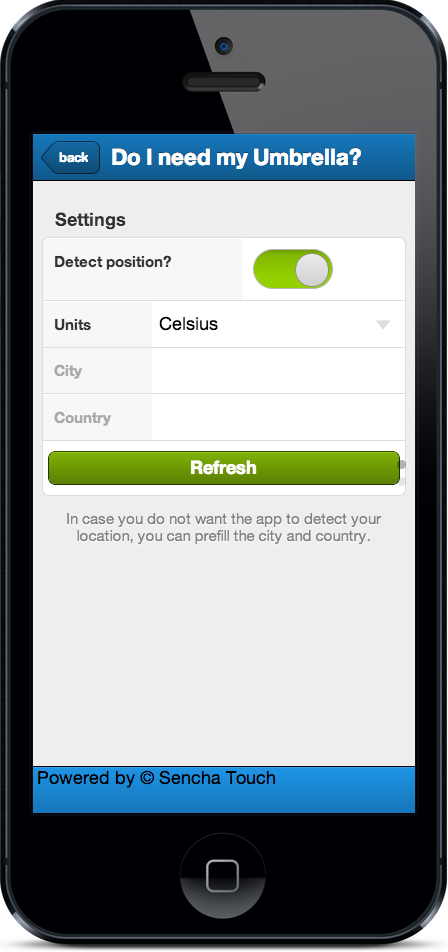
To make it look better, you will add a fieldset to the Ext.form.Panel in the SettingsView. This fieldset contains the four new fields and the submit button. The fieldset will be a child of the formpanel and has its own children: the form fields and the button.
Create a second items array in the config object (after the title property). Nest the second items array as a child. The parent items array contains one fieldset xtype, with a title: ‘Your location’, and a line with instructions.
Make sure the child items array contains all the fields and the button.
Verify your code looks like this:
Ext.define(‘Dinmu.view.SettingsView’, {
extend: ‘Ext.form.Panel’,
xtype: ‘settingsview’,
config: {
items:[{
xtype: ‘fieldset’,
title: ‘SettingsView’,
instructions: ‘In case you do not want the app to detect your location you can enter the city and country.’,
items: [
{
name: ‘geo’,
xtype: ‘togglefield’,
label: ‘Geo’
},
{
name: ‘units’,
xtype: ‘selectfield’,
label: ‘Units’
},
{
name: ‘city’,
xtype: ‘textfield’,
label: ‘City’
},
{
name: ‘country’,
xtype: ‘textfield’,
label: ‘Country’
},
{
xtype: ‘button’,
text: ‘Submit’,
ui: ‘confirm’
}
]
}]
}
});
Open your browser and run: http://localhost/dinmu. You should see the settings form with a title and some instructions. But there is something odd with the select unit field. It has no values.
Let’s add some values to the units selectfield.
Create an options array with two objects. One with the text: ‘Fahrenheit’ and a value: ‘f’ and one object with the text: ‘Celsius’ and the value: ‘c’.
The label GEO in the togglefield makes little sense. Change this label to: ‘ Auto detect?’ Since the text for this label takes much more space, we will set the labelWidth to ‘55%’. Set the value of the geo field to value: ‘1’ to enable geolocation by default.
Disable the units, city and country fields by adding disabled: true to all fields.
The button text, should be Refresh instead of Submit. Change this in the button component. Add a margin with the value ‘10 5’. Also add an action property to the button and set this to ‘refresh’. This way, we can reference the button later:
{
xtype: ‘button’,
text: ‘Refresh’,
action: ‘refresh’,
margin: ’10 5′
ui: ‘confirm’
}
You might have noticed that the console outputs some warnings. The Ext.Loader, the mechanism that loads all the Sencha Touch framework classes in the correct order into memory, needs to load the classes that are used for the form fields. Create a requires array, (above the config object) and assign it the following strings:
requires: [
‘Ext.form.FieldSet’,
‘Ext.field.Toggle’,
‘Ext.field.Select’,
‘Ext.field.Text’,
‘Ext.Button’
],
You’ve finished the interface.
Here’s the complete code for the settingsview:
Ext.define(‘Dinmu.view.SettingsView’, {
extend: ‘Ext.form.Panel’,
xtype: ‘settingsview’,
requires: [
‘Ext.form.FieldSet’,
‘Ext.field.Toggle’,
‘Ext.field.Select’,
‘Ext.field.Text’,
‘Ext.Button’
],
config: {
items:[{
xtype: ‘fieldset’,
title: ‘SettingsView’,
instructions: ‘In case you do not want the app to detect your location you can enter the city and country.’,
items: [
{
name: ‘geo’,
xtype: ‘togglefield’,
label: ‘Auto Detect?’,
labelWidth: ‘55%’,
value: ‘1’
},
{
name: ‘units’,
xtype: ‘selectfield’,
options: [
{
text: ‘Fahrenheit’,
value: ‘f’
},
{
text: ‘Celsius’,
value: ‘c’
}],
label: ‘Units’,
disabled: true
},
{
name: ‘city’,
xtype: ‘textfield’,
label: ‘City’,
disabled: true
},
{
name: ‘country’,
xtype: ‘textfield’,
label: ‘Country’,
disabled: true
},
{
xtype: ‘button’,
text: ‘Refresh’,
action: ‘refresh’,
margin: ’10 5′,
ui: ‘confirm’
}
]
}]
}
});
But wait, what about the main view? Yes, you will dynamically inject this page with data. Therefore, you will need some logic to achieve this, so let’s start with creating a controller.
How do I go about Building The Controller?
The controller will be the glue between the settings model (the app data) and the settings view. It will contain references to all view components and dispatch its events. Navigate to the dinmu folder and run the following command from the command line:
sencha generate controller Main
This command generates the Main controller. Open app/controller/Main.js with your editor. You will see a controller with an empty references object (refs) and an empty control object.
Next, let’s create references to all the view components, main, settingsview, the titlebar settings and back buttons and to the settings form fields and refresh button. The selectors are a bit CSS-like. Your code could look like this:
refs: {
mainView: ‘main’,
settingsView: ‘settingsview’,
btnSettings: ‘main button[action=settings]’,
btnRefresh: ‘settingsview button[action=refresh]’,
btnBack: ‘main button[action=back]’,
toggleGeo: ‘settingsview togglefield’,
fieldCity: ‘settingsview textfield[name=city]’,
fieldCountry: ‘settingsview textfield[name=country]’,
fieldUnits: ‘settingsview selectfield’
},
Now that you have references to all the view components that should contain events, you can add the controls.
control: {
‘btnRefresh’: {
tap: ‘onRefresh’
},
‘btnSettings’: {
tap: ‘onSettingsBtnTap’
},
‘btnBack’: {
tap: ‘onBackBtnTap’
},
‘toggleGeo’: {
change: ‘onToggle’
},
‘mainView’: {
activeitemchange: ‘onCarouselChange’
}
}
Before browser testing the events, you must hook the controller to app.js which is the MVC’s entry point. Open app.js, create a controllers array, right below the requires array and pass in the string ‘Main’ mapping the Main controller to the app/controller/Main.js file.
controllers: [
‘Main’
],
Now, we will add some logic. Go back to Dinmu.controller.Main and add the functions in the goodies-tutorial directory. You can find them in controller.txt.
Replace the launch function with the functions provided.
Is Setting Up Stores and Singletons easy?
Stores encapsulate a client side cache of model objects. Stores can have a Proxy too, and also provide functions for sorting, filtering, grouping and querying the model instances (records) contained within it.
Our app needs a store to save all the user settings.
Unfortunately, you can’t generate stores with Sencha Cmd. Instead, let’s create a new file in the app/store folder called: Settings.js. Define a new class: Dinmu.store.Settings. This class extends all methods and properties from the Ext.data.Store class. In the config object, create a property called: model. It should connect to the Setting model. Also, the settings store should load automatically:
Ext.define(‘Dinmu.store.Settings’, {
extend: ‘Ext.data.Store’,
requires: [‘Dinmu.model.Setting’],
config: {
model: ‘Dinmu.model.Setting’,
autoLoad: true
}
});
Open controller/Main.js, in the config object create a stores array and add the Dinmu.store.Settings store to it:
stores: ‘Dinmu.store.Settings’,
Sometimes, it’s better to separate your business logic outside the MVC folders.
In the app folder, create a new folder utils. Create the file Functions.js, and define a class called: Dinmu.utils.Functions. This class has a property: singleton set to true. Now your class is a singleton, you cannot create more than one instance of it, but you can run the singleton methods from everywhere in your code:
Ext.define(‘Dinmu.utils.Functions’, {
singleton: true,
//singleton methods here
});
Add Dinmu.utils.Functions to the requires array of the app.js file.
Open the snippet: functions.txt from the goodies-tutorial folder and copy all the functions into the utils/Functions.js file.
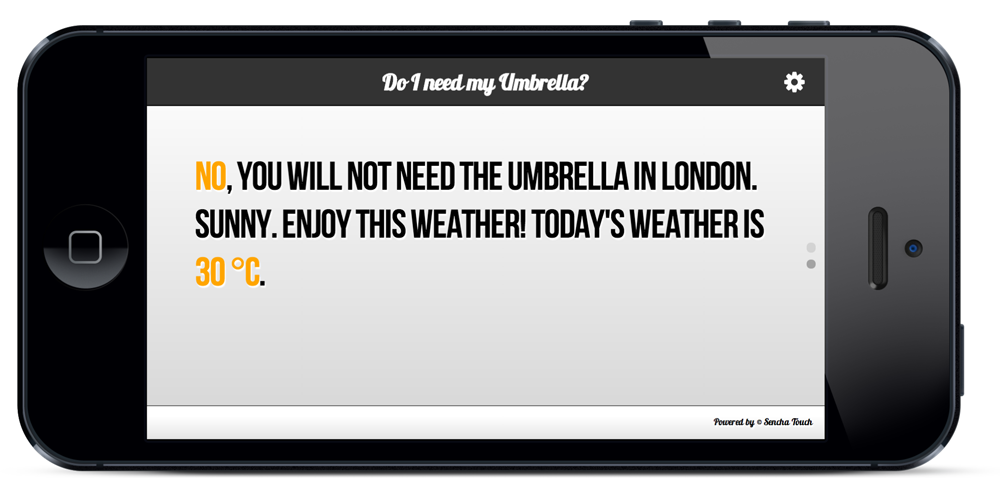
This snippet contains the functions you will need for requesting weather data from http://api.worldweatheronline.com/. If you would rather request and use your own API_KEY, you can edit it on top of the Functions.js by changing the String for property API_KEY. It also contains logic for requesting geolocation on the device and injecting data in the template on the mainview. If you are really interested in this logic, I left complete comments in the functions.txt file which describes exactly what is going on.
To test the logic, open Google Chrome Developer Tools and switch to the Console tab and enter the following line: Dinmu.utils.Functions.getWeather(‘London’) it should return a weather object for London and display some text in the mainview.
Finally the Do I need my Umbrella app is finished! Open your browser and run: http://localhost/dinmu. The next steps for improving your application would be to apply a theme and a production build. This is something I will discuss in the next Sencha Blog tutorial.
If you found this tutorial helpful and would like to sign up for technical training on Sencha Touch or Ext JS, take a look at the open courses located around the world or join an online training. After enrolling in training and developing Sencha apps, you can prove your skills with Sencha Certification. You save $200 off Sencha Certification by enrolling in our Fast Track Training courses.
 0
0
 1
1
Latest Content

4 Low-Code Software Development Platforms Ranked by Scalability
By 2026, Gartner says 80% of apps will be built using low code tools. That’s…
July 17, 2025

7 Software Development Platforms Every Startup Should Evaluate in 2025
Did you know that nearly 90% of startups fail? And one of the biggest reasons…
July 14, 2025
What’s New in Rapid Ext JS 1.1.1
The Sencha team is excited to announce the latest Sencha Rapid Ext JS 1.1.1 release…
July 8, 2025


