


 Ask Sencha AI
Meetcha—Using Sencha Touch to Build a Mobile App for Meetup.com
August 23, 2012
3270 Views
Get a summary of this article:
Guest Blog Post: Dr. Ashvin Radiya, President and CTO of AvantSoft, Inc.
Introduction
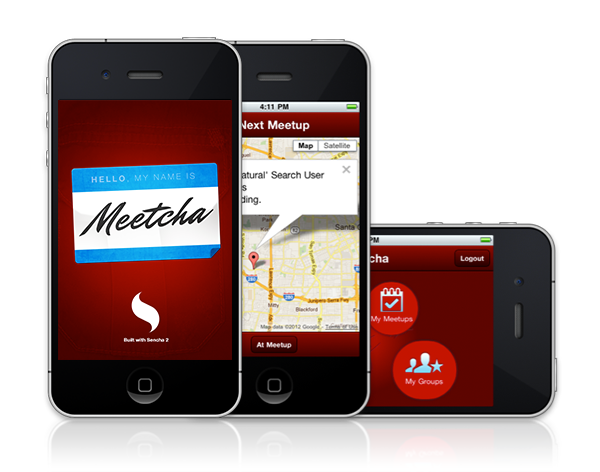
We developed the Meetcha app to demonstrate how to use Sencha Touch 2 features in a real world application. We used the Sencha Touch’s built-in MVC architecture, which we’ve found in this app and in general is absolutely required for developing large commercial applications. We also wanted the Meetcha app to have an engaging UI, so we used custom theming to create rounded buttons and non-rectangular positioning with a custom background that changes with orientation. This app also illustrates how to create context-sensitive navigation by showing the map of the meetup or home screen depending on how soon the event is taking place.
In this article, we explain the development techniques behind the following features of the Meetcha app to help you build apps in Sencha Touch 2.
- Overall Class Structure
- Building an Orientation-Aware UI
- The Power of Contextual Navigation
- Using OAuth for Authorization
- Calling the Meetup.com API
- Creating Lists with Action Buttons
- Using Dynamic forms
- Putting Local Storage To Work
- Using Plugins for Pagination
Overall Class Structure
The Meetcha application follows the standard Sencha MVC structure. The app folder contains the miscellaneous, controller, model, store and view classes. The resources folder contains the scss folder which is compiled into resource/css/app.css.
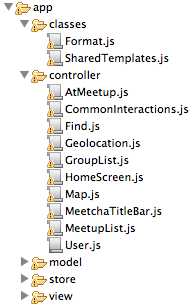
controller folder contains the controller class for various screens.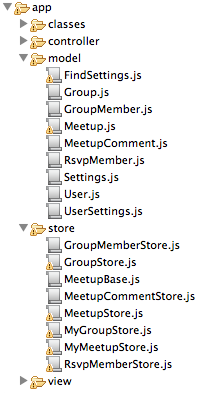
model and store folders contain classes for models and stores that power the data to the application.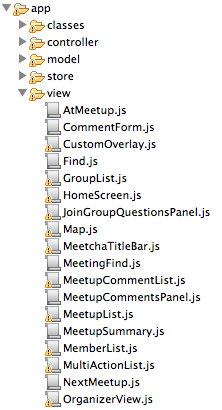
Building an Orientation-Aware UI

The first feature that we’ll discuss is the orientation-aware UI. Many mobile apps are “boxy” with rectangular and grid-like arrangements of elements. We wanted to create an engaging UI by breaking the pattern of “rectangles” and “grids” that respond to the orientation change. There are three moving parts that you need to consider to enable this feature:
- Custom background that changes with orientation
- Rounded buttons
- Reposition buttons on orientation change
Let’s take a look at how we can achieve this with Sencha Touch.
First, different images are referenced as backgrounds in two CSS classes: home-landscape and home-portrait in app.scss.
	.home-landscape > .x-body {
			background: url('../images/meetcha_screen_bg_landscape.png') top left no-repeat;
	}

	.home-portrait > .x-body {
			background: url('../images/meetcha_screen_bg.png') no-repeat;
	}
Next, the radial glow effect is produced by setting a CSS class for the container of the buttons in _buttons.scss.
	.button-container {
			position:relatve;
			@include radial-gradient(color-stops(rgba(196,0,0,1) 0%, rgba(92,0,0,1) 100%));
			border: 0 !important;
			margin: 0 !important;
			padding-left: 20px;
	}
The rounded effect of the buttons is created by styling the background, border-color, border-radius, width, height, z-index, button label and button icons.
	.home-button {
			@include box-shadow;
			background-image: none !important;
			background-color: rgba(196,0,0,1) !important;
			border-color: #990000;
			@include border-radius($button-height * 2);
			width: 100px;
			height: 100px;
			z-index: 0 !important;

			&.mygroups, &.findmeetups {
					width: 120px;
					height: 110px;
			}

			.x-button-label {
					color: #fff;
					font-weight: normal;
					font-size: 14px;
			}

			.x-button-icon {
					width: 4em;
					height: 2.5em;
					background-repeat: no-repeat;
					-webkit-mask-repeat: no-repeat;
					margin-top: 5px;
			}
	}

	.findmeetups, .mygroups, .findgroups {
			.x-button-icon {
					margin-top: 0.7em;
			}
	}
Next, we define buttons to have different positions and background class for its container based on the orientation in doOrientation( ) in Meetcha.view.HomeScreen class as follows:
	Ext.define('Meetcha.view.HomeScreen', {
			extend: 'Ext.Container',
			xtype: 'homescreen',
			config: {
					xtype: 'container',
					cls: 'button-container',
					defaults: {
							iconAlign: 'top',
							margin: 10,
							top: 0,
							left: 0
					},
					items: [{
							xtype: 'button',
							cls: 'home-button findmeetups',
							pleft: 18,
							ptop: 40,
							ltop: 0,
							lleft: 48,
							iconCls: 'find-meetups',
							text: 'Find Meetups',
							action: 'findmeetups'
					}, //...more buttons
			]
			},

			initialize: function() {
					this.on('painted', this.doOrientation, this);
					Ext.Viewport.on('orientationchange', this.doOrientation, this);
					this.callParent();
			},

			doOrientation: function() {
					var me = this,
							orientation = Ext.Viewport.getOrientation(),
							letter = orientation.charAt(0),
							items = this.getItems().getRange(),
							i = 0,
							ln = items.length,
							item, el, top, left;

					me.element.removeCls(me.orientationCls);
					me.element.addCls('home-' + orientation);
					for (; i < ln; i++) {
							item = items[i];
							top = item.initialConfig[letter + 'top'];
							left = item.initialConfig[letter + 'left'];
							el = item.element;
							if (el) {
									el.setBox({
											top: top,
											left: left
									});
							}
					}
			}
	});
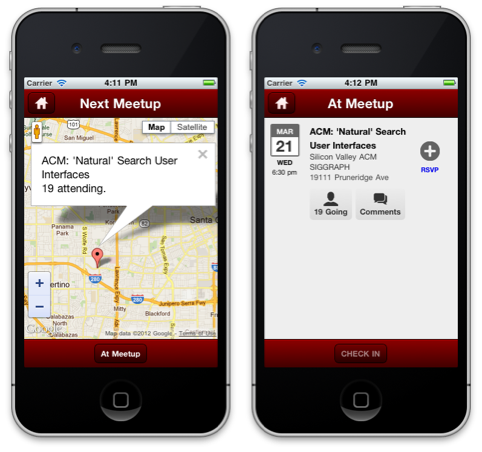
The Power of Contextual Navigation
To make applications more usable, it’s important to create a user flow that is “contextual” by presenting relevant information to the user with appropriate navigation choices. In the Meetcha app, we show different screens to the user based on when the application is launched. If it’s within two hours of the meetup time, the user is most likely looking for the meetup map, so we show the Next Meetup screen; otherwise we show the Home Screen. From the Next Meetup screen, the attendee can tap on the At Meetup button at the bottom to check in. The logic is in controller.HomeScreen.js.
	decideWhatToDo : function(){
			var me         = this,
			upcomingEvents = Ext.create('Meetcha.store.MyMeetupStore'),
			user           = me.getApplication().getController('User').getCurrentUser(),
			dt             = new Date(),
			inTwoHours     = Ext.Date.add(dt, Ext.Date.HOUR, 2);

			upcomingEvents.load({
					params : {
							member_id : user.id,
							time : dt + ',' + inTwoHours
					},
					callback: function(records){
							if(records.length > 0){
									Ext.Viewport.setMasked({
											xtype: 'loadmask',
											message: 'Upcoming meetup(s) found.  Loading Map'
									});
									me.showNextMeetup(records[0]);
							} else {
									me.showHomeScreen();
							}
					}
			});
	}
Using OAuth for Authorization
Meetup.com requires OAuth for authorization. The OAuth protocol requires a callback from the server to the client, which means it can’t be called directly from the Sencha Touch app. We built an intermediate layer using PHP to support OAuth and make calls to the server to retrieve data. The PHP code is hosted on the Sencha servers and we provide all the relevant parts here in this blog post. One of the key requirements of the app design was to avoid asking the user to authorize with Meetup.com every time the app launches, so we achieved this by storing authorization information in a cookie. Here’s how we did it:
- During the app launch, perform the authorization check.
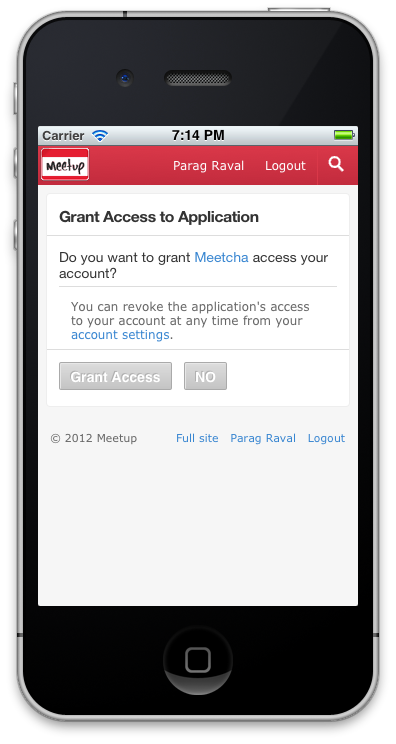
- When the app is accessed for the first time, prompt the user to authorize the Meetcha application on Meetup.com. Set the authorization details in a cookie.
- For any subsequent launches, use the authorization details from the cookie to access the user details.
- If a user logs out, then clear the cookie.
The following screens show the user interactions for OAuth authorization in the Meetcha app.
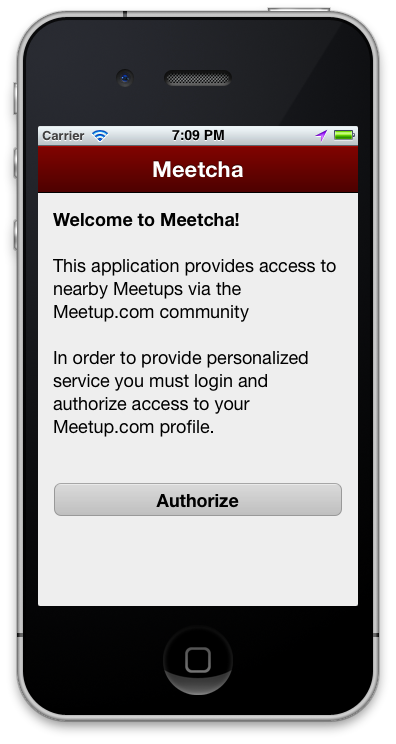

We’ll explain some of the key concepts we used with OAuth authorization.
How to Set a Cookie on Your Server
In the Meetcha app, we set the member_id and other authorization information in a cookie after successful login and Meetcha app authorization.
	…
	…
	$thirtydays = time()+60*60*24*30;
	setcookie('oauth_token', $oauth_token_per, $thirtydays, '/');
	setcookie('oauth_token_secret', $oauth_token_secret_per, $thirtydays, '/');
	setcookie('member_id', $member_id, $thirtydays, '/');
	…
	…
How to Check for a Cookie on Your Server
The first time a user logs in, the code returns -1 since there is no member and authorization information found in the cookie. For subsequent calls, the code returns member ID info in the cookie.
	...
	...
	if($_COOKIE['member_id'] && $_COOKIE['oauth_token'] && $_COOKIE['oauth_token_secret']){
			jsonEcho(json_encode(array('results' => array('id' => $_COOKIE['member_id']))));
	}else{
			jsonEcho(json_encode(array('results' => array('id' => -1))));
	}
	...
Logic for Authorization in Meetcha.controller.User
When the app launches, it loads the User model (which communicates with user_check.php). If the User model is loaded successfully (based on the previous authorization state) for a valid user, then it shows the application home screen; otherwise it shows the Welcome screen to authorize the user.
	...
			launch: function() {
					var me = this;
					Meetcha.model.User.load(1, {
							success: function(rec) {
									var id         = rec.get('id'),
											app        = me.getApplication(),
											homeScreen = app.getController('HomeScreen');
									Ext.Viewport.add({
											docked: 'top',
											xtype: 'meetchatitlebar',
											title: 'Meetcha'
									});
									if (id == -1) {
							homeScreen.promptForLogin();
									} else {
											me.setCurrentUser({
													id: id
											});
											homeScreen.decideWhatToDo();
											app.getController('Find').initializeSettings();
									}
							}
					});
			}
	...
Calling the Meetup.com API
The Meetup.com API documentation describes how you can use their API to access Meetup data from your application. It accepts HTTP GET request to receive information for meetup events, groups, comments, meetup venues, RSVP, check-ins, member profiles, etc; and it accepts HTTP POST to add a new meetup, do meetup check-in, do RSVP, create profile, add photos, etc. The typical structure of the API call is as follows:
<a href="https://api.meetup.com/<>.<>?<>&<>” target=”_new”>https://api.meetup.com/<<methodName>>.<<responseDataFormat>>?<<setOfRequestParams>>&<<API_Key>>
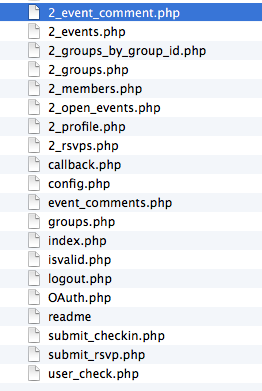
The Meetup API supports authentication for third-party applications; the Meetcha app uses the OAuth protocol which requires a callback, so we created a PHP wrapper to the Meetup.com API with the following features:
- Built to communicate with https://api.meetup.com for accessing the Meetup data based on Meetcha consumer API key.
- Uses OAuth as an authorization protocol to access user’s information securely.
- Upon authorization, sets the OAuth token and secret as a cookie, so it can be used for various API calls.
- Makes GET requests to query meetup data like group, events, members, rsvp, etc.
- Makes POST requests to add/edit the event details, comment, rsvp and check-in information.
As an example, here is the code snippet of 2_events.php, which is a wrapper to call the events API on Meetup (at this endpoint: https://api.meetup.com/2/events).
	session_start();
	require_once ("OAuth.php");
	require_once ("config.php");

	$time = readGetParam('time', null);

	$offset = readGetParam('page', 0) - 1;
	$meetup_url = 'https://api.meetup.com/2/events?fields=self&member_id='.$member_id.'&page='.readGetParam('limit', 20).'&offset='.$offset;
	if($time != null){
			$meetup_url .= '&time='.urlencode($time);
	}
	$signature = new OAuthSignatureMethod_HMAC_SHA1();
	$consumer = new OAuthConsumer($key, $secret, NULL);
	$token = new OAuthConsumer($oauth_token_per, $oauth_token_secret_per, 1);
	$request = OAuthRequest::from_consumer_and_token($consumer, $token, "GET", $meetup_url);
	$request->sign_request($signature, $consumer, $token);
	$header = $request->to_header("https://api.meetup.com");

	error_log('2_events_URL:' . $meetup_url);
	$meetup_response = _http_request($meetup_url, $header);

	jsonEcho($meetup_response);
In the Sencha Touch app, the URL to the server side PHP is set in the Store’s Proxy, or in the Ajax call in the controller to retrieve the data.
Creating Lists with Action Buttons
In this section, we explain how to build custom lists with action buttons. This will be useful to many developers, as it’s a very common requirement.
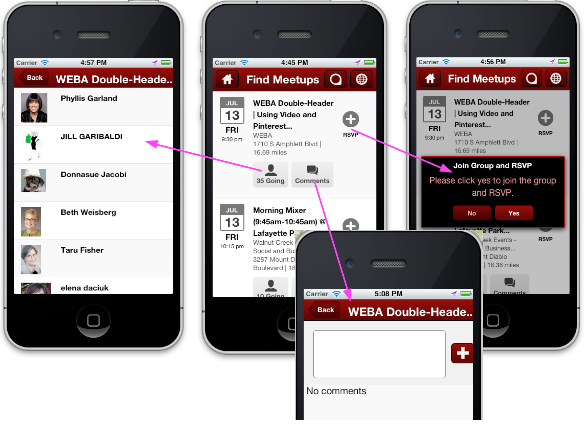
There are many similar lists in our app such as Find Meetups, My Meetups, etc, so we created a abstraction called MultiActionList and put the common code in a base class. A derived class has the responsibility of defining an itemTpl with <a> elements as well as “action” and “store id” attributes. In the base class MultiActionList, the event handler for tap will fire a new event, passing in the data record behind that list item. Below is the code from MultiActionList class.
	Ext.define('Meetcha.view.MultiActionList' ,{
			extend : 'Ext.dataview.List',
			…
			initialize : function() {
											this.on(
							'tap',
							function(event, target) {
									var action  = target.getAttribute('action'),
											id      = target.getAttribute('mu:id'),
											record  = id && this.getStore().getById(id);

									this.fireEvent('actionTap', this, action, record, event, target);
							},
							this,
							{
									delegate: 'a[action]',
									element: 'innerElement'
							}
					);
			}
	…
	…
In a subclass, such as Meetcha.view.MeetupList, itemTpl is defined with <a> elements which are styled to look like a button.
	Ext.define('Meetcha.view.MeetupList', {
			extend: 'Meetcha.view.MultiActionList',
			…
			config: {
					…
					itemTpl: Ext.create('Ext.XTemplate',
							// Right Column
							'<div class="ml-rsvp">',
									'<tpl if="!self">',
											// RSVP action section
											'<a class="add-btn button" href="javascript:null;" action="join" mu:id="{id}">RSVP</a>',
									'<tpl elseif="this.hasWait(values)">',
											// Wait List
											'Wait List',
									'<tpl elseif="this.hasRsvp(values)">',
											'<tpl if="this.isAttending(values)">',
											// Attend + Cancel action section
											'Going<br/><a class="checkmark-btn button summary-cancel" href="javascript:null;" action="cancel" mu:id="{id}">Cancel</a>',
											'<tpl else>',
													// Attend action section
													'<a class="add-btn button summary-rsvp" href="javascript:null;" action="joinDirectRsvp" mu:id="{id}">RSVP</a>',
											'</tpl>',
									'<tpl else>',
											// Attend action section
											'<a class="add-btn button summary-rsvp" href="javascript:null;" action="joinDirectRsvp" mu:id="{id}">RSVP</a>',
									'</tpl>',
							'</div>',
	…
	…
Then, a controller for this view can handle actionTap event and take appropriate actions. For example, the MeetupList controller class uses the actionTap handler for processing requests for Join a group or attend a meetup.
	Ext.define('Meetcha.controller.MeetupList', {
			…
			…
					control: {
							'meetuplist': {
									actionTap: 'onActionTap'
							},
	…
			onActionTap: function(list, action, record, event, target) {
					switch (action) {
							case 'join':
									this.promptForJoinAndRsvp(record);
									break;
							case 'attend':
									this.rsvp(record);
									break;
			…
			…
					}
			},

			promptForJoinAndRsvp: function(record) {
					Ext.Msg.confirm('Join Group and RSVP', 'Please click yes to join the group and RSVP.', function(buttonId) {
							if (buttonId == 'yes') {
									this.checkForGroupQuestions(record);
							}
					}, this);
			},
			…
			rsvp: function(event_id, event_name, rsvp) {
					var me      = this,
							rsvpURL = serverUrl + 'php/submit_rsvp.php';
			…
			…
			}
			…
Using Dynamic Forms
In many applications, there’s a practical need to generate dynamic forms. In Meetcha app, before a user can RSVP for a meetup, they must join the hosting group which in turn can optionally require the user to answer several custom questions as shown below.
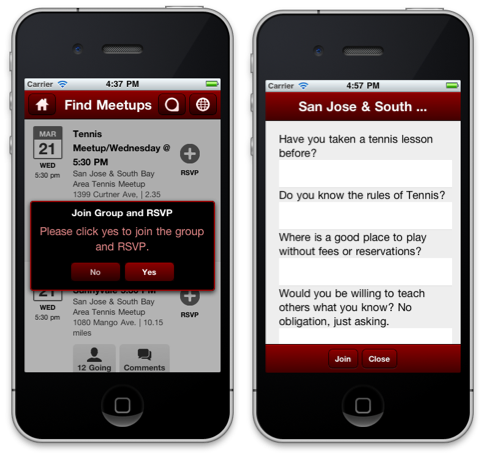
A different group may present a different set of questions.

Below, in Meetcha.controller.MeetupList, we check to see if the group has questions. If it has questions, then we instantiate a view with xtype joingroupquestionspanel.
	Ext.define('Meetcha.controller.MeetupList', {
	…
			/*
			 * Some meetups require the user to answer questions before joining the group.
			 */
			checkForGroupQuestions: function(record) {
					var me = this;
					Ext.data.JsonP.request({
							url: serverUrl + 'php/2_groups_by_group_id.php',
							method: 'GET',
							params: {
									group_id: record.get('group').id
							},
							success: function(result, request) {
									var eventId   = record.get('id'),
											eventName = record.get('name'),
											results   = result.results[0];

									if (results.join_info.questions_req == '1' && results.join_info.questions) {
											me.getMeetchaTitleBar().hide();
											Ext.Viewport.add({
													xtype: 'joingroupquestionspanel',
													event_id: eventId,
													event_name: eventName,
													group: results
											}).show();
									} else {
											this.joinAndRsvp(eventId, eventName, results);
									}
							},
							scope: this,
							record: record
					});
			},
	…
	…
Next, in Meetcha.view.JoinGroupQuestionsPanel, using the initialize() function, we iterate through a list of questions and add a pair of items for each question—a component that shows the question text with a textfield for the user to enter the answer to that question.
	Ext.define('Meetcha.view.JoinGroupQuestionsPanel', {
			extend: 'Ext.form.Panel',
	…
	…
			/*
			 * Populate the questions etc that this panel needs from the configuraiton
			 */
			initialize: function() {
					var me             = this,
							group          = this.getGroup(),
							grpName        = Ext.util.Format.ellipsis(group.name, 20, false),
							questions      = group.join_info.questions,
							i              = 0,
							questionFields = [],
							q;

					me.add({
							xtype: 'toolbar',
							docked: 'top',
							itemId: 'topToolbar',
							title: grpName
					});

					if (questions) {
							for (; i < questions.length; i++) {
									q = questions[i];
									questionFields.push({
											xtype: 'component',
											html: q.question,
											cls: 'question-label'
									});

									questionFields.push({
											xtype: 'textfield',
											name: q.id,
											ui: 'dark'
									});
							}
							me.add(questionFields);
					}
			},
	…
Putting Local Storage to Work
Local storage is another very common requirement for Sencha Touch apps. In the Meetcha app, user preferences are stored in localStorage. To find a meetup, the user can choose whether to use their current location, a preferred zip code and distance within which to find a meetup, and interests. User preferences are also stored for finding groups.
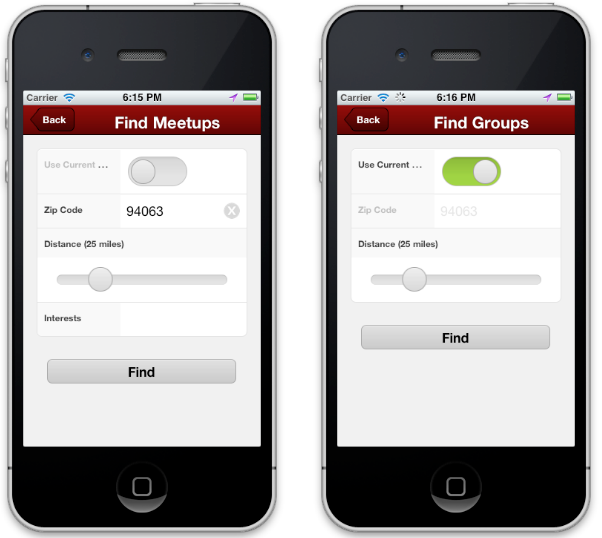
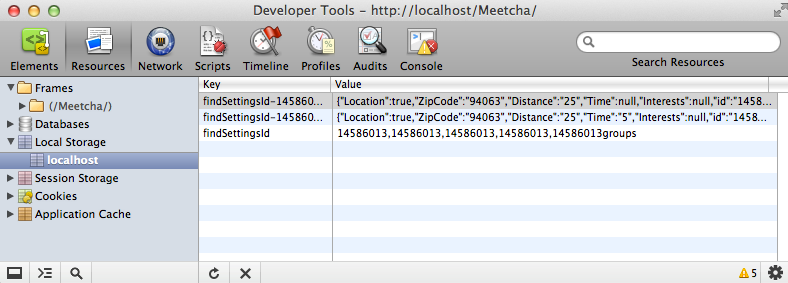
This is very easy to achieve in Sencha Touch by declaring localstorage as proxy type in Meetcha.model.FindSettings model.
	Ext.define('Meetcha.model.FindSettings', {
			extend: 'Ext.data.Model',
			config: {
					idProperty: 'id',
					fields: [{
							name: 'Location',
							type: 'boolean'
					}, {
							name: 'ZipCode',
							type: 'string'
					}, {
							name: 'Distance',
							type: 'string'
					}, {
							name: 'Time',
							type: 'string'
					}, {
							name: 'Interests',
							type: 'string'
					}],
					proxy: {
							type: 'localstorage',
							id: 'findSettingsId'
					}
			}
	});
Using Plugins for Pagination
The pagination is straightforward to add to a Sencha Touch app. In the Meecha app, we used two Sencha Touch 2 plugins to support pagination for various lists to show meetup events, groups and group members.
-
Ext.plugin.PullRefresh (xtype: pullrefresh) makes a load request to the Meetup store when the user pulls down the list.
Ext.plugin.ListPaging (xtype: listpaging) makes a load request to the Meetup store when a user scrolls to end of the list.
# Meetcha.view.MeetupList
	Ext.define('Meetcha.view.MeetupList', {
			extend: 'Meetcha.view.MultiActionList',
			alias: 'widget.meetuplist',
			requires: 'Ext.plugin.PullRefresh',
			config: {
					emptyText: 'No Meetups found',
					cls: 'meetup-list',
					loadingText: 'Loading Meetups...',
					plugins: [{
							type: 'pullrefresh',
							pullRefreshText: 'Pull down to refresh meetups!'
					}, {
							type: 'listpaging',
							autoPaging: true,
							loadMoreText: ''
					}],
					itemTpl: Meetcha.classes.SharedTemplates.meetupSummary
			}
	});
How to Download and Run the Application
You can download the source files of Sencha Mobile application with PHP files from the following URL—https://github.com/avantsoft/meetcha.git.
To run this application, you need to deploy both the Sencha Mobile application and PHP scripts that communicate with Meetup.com using OAUTH. You can deploy both on the same server or different servers. The Meetcha/php/readme file has the detailed setup instructions. As explained in the readme file, you will need to (1) create an application on Meetup.com and set your OAUTH consumer key and secret in Meetcha/php/config.php, (2) host PHP files on a server and set post-authorization destination URL in Meetcha/php/index.php, and (3) set up the files of Sencha mobile application on a server and point the serverUrl in Meetcha/index.html to the PHP server.
Conclusion and Future Extensions
We encourage and invite community members to make extensions to this app and contribute more cool techniques that others can view in the context of a real world application. Some of the ideas for extensions include:
- Add animation effects when buttons are tapped on the home screen using Sencha Animator.
- Add features to support attendee interactions around a meetup. For example, view checked-in attendees of the meetup, post messages to the meetup attendees, personal chats between attendees at the meetup, create profiles to be shown for a specific meetup, etc.
- Use the Sencha Touch Native Packager to capture and post photos.
- Store Meetup and Group data in local storage and refresh only as needed, so the app is usable in offline mode.
- Use Sencha Charts to present meetup statistics.
You can build cool apps with Sencha Touch! Get out of the “rectangular” design mindset and start building apps that are easy to use with contextual information and navigation. Users will be delighted, and you’ll have more fun developing the app. Just like we did!


Latest Content

What we're building next: Sencha 2026/2027 Roadmap Update
In this Sencha 2026/2027 roadmap update, you’ll find a detailed summary of what we’ve planned…
July 23, 2026

12 Best Application Development Software Tools for Enterprise Teams in 2026
Enterprise teams in 2026 build applications using a stack of complementary application development software tools…
July 16, 2026

7 Best React Data Grids in 2026: Performance, Features, and Pricing Compared
React data grid selection significantly affects enterprise application development outcomes because grids are often the…
July 16, 2026


