


 Ask Sencha AI
How to Call Google Natural Language APIs from JavaScript Web Framework
April 18, 2021
2780 Views
Get a summary of this article:
If you want to take your site to next level, Ext JS from Sencha is an extensive Javascript framework that lets you build state-of-the-art, cross-platform web applications. More significantly, Ext JS gives you the tools to seamlessly implement the latest tech, like AI and Machine learning apps. If learning how to call things like the Google natural language APIs from Ext JS interests you, read on to see how you can get started using ML and AI with this powerful javascript web framework.
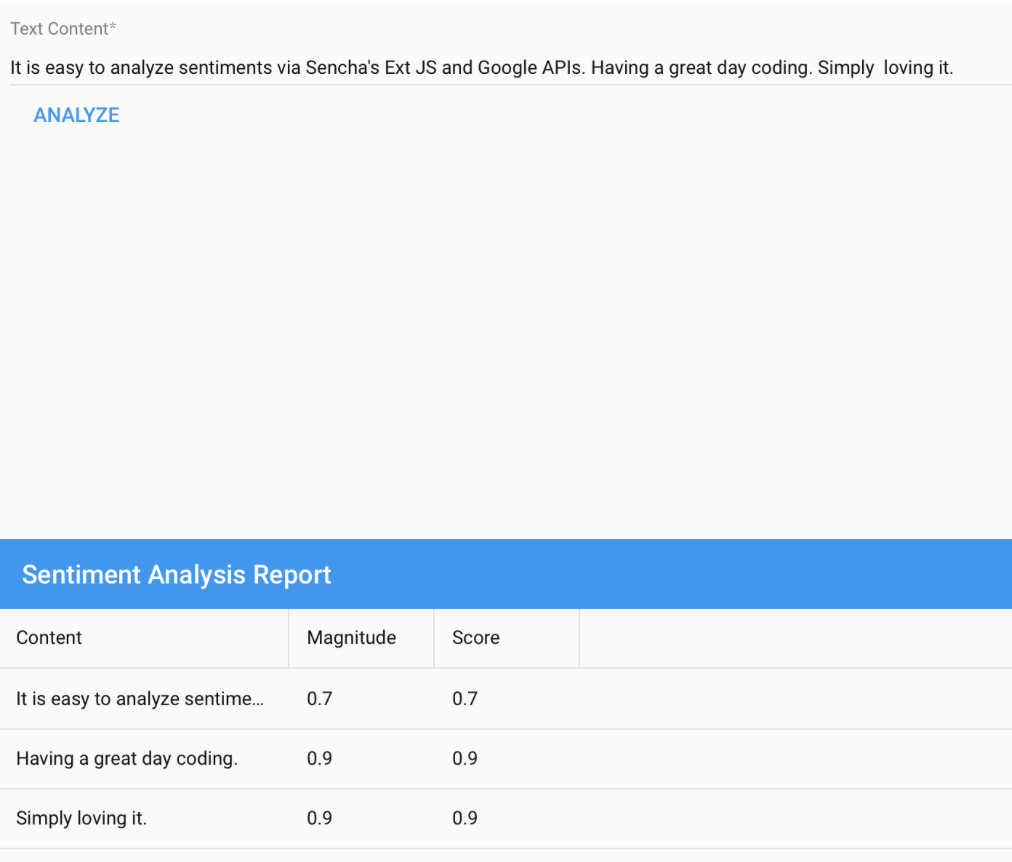
Google’s analyze-sentiment API does exactly what its name suggests. Using AI, it parses a set of sentences and returns feedback describing the sentiment they show, and displays sentiment magnitude and a separate score for each sentence. The analyze-sentiment API results look like this:
Prerequisites to get started with JavaScript Web Framework
To get started you will need to have the following tools installed on your machine. You can download them using the links provided:
You will also need a Google Cloud account with the Cloud Natural Language APIs enabled and a generated API KEY. If you are not sure where to start, Here is a Quickstart link, to get you moving. Use this if you don’t have an API key already.
Test the Google Cloud Natural Language API
Now, to test the Google Cloud Natural Language API, open your command prompt and type the following:
$ gcloud ml language analyze-sentiment --content="Sencha is awesome. Build a fantastic app"
What you will end up with is JSON text that looks like this:
{
  "documentSentiment": {
    "magnitude": 1.6,
    "score": 0.8
  },
  "language": "en",
  "sentences": [
    {
      "sentiment": {
        "magnitude": 0.9,
        "score": 0.9
      },
      "text": {
        "beginOffset": 0,
        "content": "Sencha is awesome."
      }
    },
    {
      "sentiment": {
        "magnitude": 0.6,
        "score": 0.6
      },
      "text": {
        "beginOffset": 19,
        "content": "Build a fantastic app"
      }
    }
  ]
}
As you can see, the output has an overall document score as well as a sentiment score and magnitude for each sentence.
Get Started with JavaScript Web Framework
Once you have completed the test, to get started on your project using Google Cloud Natural Language API you will need to generate an Ext JS minimal desktop application. You do this by using the Sencha Ext JS 7.0 Modern Toolkit.
As an example, I have created the source files in a folder called google-nlp-demo-app. You will need to edit the index.html file in the main folder and add this line somewhere in the header:
<script src="https://apis.google.com/js/api.js"></script>
Create the Sentiment Report Grid
By default, the sentiment analyzer outputs a JSON file. To display the sentiment magnitude and score for each sentence a grid, follow these steps:
Create a new file ReportGrid.js and add the columns for sentence text, magnitude, and scores to it.
Ext.define('GoogleNLPDemoApp.view.ReportGrid', {
   extend: 'Ext.grid.Grid',
   xtype: 'reportgrid',
   columns: [{
       type: 'column',
       text: 'Content',
       dataIndex: 'content',
       width: 200
   }, {
       text: 'Magnitude',
       dataIndex: 'magnitude'
   }, {
       text: 'Score',
       dataIndex: 'score'
   }]
});
Create the Main View
To create your Main view, all you need to do is edit the MainView.js file. Just add the following:
-
A text field for the input string.
-
A button that analyses the sentiment in the input text when you click it.
-
The Report grid you just created.
Add the following code to your MainView.js.
items: [{
     xtype: 'fieldset',
     items: [{
         xtype: 'textfield',
         label: 'Text Content',
         placeholder: 'Enter text for analysis',
         name: 'textContent',
         required: true,
         reference: 'ct'
      },{
         xtype: 'button',
         text: 'analyze',
         handler: 'onAnalyzeClick'
      }]
},   {
      xtype: 'reportgrid',
      title: 'Sentiment Analysis Report',
      bind: {
          store: '{nlpStore}'
      }
}],
To hold the data in memory, create a store called nlpStore:
viewModel: {
      stores: {
          nlpStore: {
              type: 'store',
              storeId: 'dStore',
              autoLoad: true,
              fields:[{
                  name: 'content',
                  mapping: 'text.content'
              },
              {
                  name: 'magnitude',
                  mapping: 'sentiment.magnitude'
              },
              {
                  name: 'score',
                  mapping: 'sentiment.score'
              }
              ],
              proxy: {
                  type: 'memory',
                  data: null,
                  reader: {
                      rootProperty: 'sentences'
                  }
              }
          }
      }
  }
Once you are done, the completed MainView.js code should look like this:
EExt.define('GoogleNLPDemoApp.view.main.MainView', {
    xtype: 'mainview',
    controller: 'mainviewcontroller',
    extend: 'Ext.Panel',
    layout: 'vbox',
    items: [{
        xtype: 'fieldset',
        items: [{
                xtype: 'textfield',
                label: 'Text Content',
                placeholder: 'Enter text for analysis',
                name: 'textContent',
                // validate not empty
                required: true,
                reference: 'ct'
            },
            {
                xtype: 'button',
                text: 'analyze',
                handler: 'onAnalyzeClick'
            }
        ]
    }, {
        xtype: 'reportgrid',
        title: 'Sentiment Analysis Report',
        bind: {
            store: '{nlpStore}'
        }
    }],
    viewModel: {
        stores: {
            nlpStore: {
                type: 'store',
                storeId: 'dStore',
                autoLoad: true,
                fields: [{
                        name: 'content',
                        mapping: 'text.content'
                    },
                    {
                        name: 'magnitude',
                        mapping: 'sentiment.magnitude'
                    },
                    {
                        name: 'score',
                        mapping: 'sentiment.score'
                    }
                ],
                proxy: {
                    type: 'memory',
                    data: null,
                    reader: {
                        rootProperty: 'sentences'
                    }
                }
            }
        }
    },
    defaults: {
        flex: 1,
        margin: 16
    }
});
Create the Controller
Now it is time to create the controller. The controller will handle the ‘analyze button’ click by making a call to Google cloud API. To do this, add the following code to MainViewController.js file:
Ext.define('GoogleNLPDemoApp.view.main.MainViewController', {
    extend: 'Ext.app.ViewController',
    alias: 'controller.mainviewcontroller',
    onAnalyzeClick: function(button) {
        txtToSend = this.lookupReference('ct').getValue();
        console.log('value:{}', txtToSend);
        gapi.load('client', this.sendRQ);
    },
    sendRQ: function() {
        //modified from https://gist.github.com/MarkEdmondson1234/ff857ef8c8e851d08c67bf057f4cc4e3
        gapi.client.init({
            'apiKey': 'YOUR_API_KEY',
            'discoveryDocs': ['https://language.googleapis.com/$discovery/rest?version=v1beta1']
        }).then(function() {
            return gapi.client.language.documents.analyzeSentiment({
                'document': {
                    'type': 'PLAIN_TEXT',
                    'content': txtToSend
                }
            });
        }).then(function(resp) {
            var analysisResponse = resp;
            var data = resp.result;
            console.log(resp.result);
            var store = Ext.data.StoreManager.lookup('dStore');
            console.log('dStore:{}', store);
            store.getProxy().data = data;
            store.reload();
        }, function(reason) {
            console.log('Error: ' + reason.result.error.message);
        });
    }
});

var txtToSend = null;
In the code above the sendRQ() function initializes the gapi client, makes the API call, and modifies the store with the response data. Make sure to replace the placeholder ‘’YOUR_API_KEY’ with your API-KEY.
Conclusions
As you can see, Sencha’s Ext JS framework makes it easy to call the Google natural language API from a Javascript client. Try it yourself here by downloading the complete source code.
Adding Google Natural Language APIs to JavaScript web frameworks opens exciting options. It’s for developers who want to add advanced language analysis to their applications. As technology marches forward, choosing the right JavaScript framework becomes important. That’s why developers need to weigh factors. They should consider things that include community support, performance, and scalability. They should think about them when making their decision.
For those diving into JavaScript frameworks, our article is on “How to Create a Responsive JavaScript Admin Dashboard with Ext JS“. It provides tips for using Ext JS to make dashboards. Are you interested in speeding up UI development? Learn how with top UI widget libraries in “How To Accelerate UI Development With The Best UI Widget Library?”. These resources offer practical advice for developers. They focus on using JS frameworks and UI widget libraries.
By staying informed about new frameworks and industry trends, developers can make smart choices. They can also keep up with the changing demands of web development. Trying new tools and staying current boosts skills. It also helps make innovative and effective web apps that speak to today’s users.
Happy Coding!


Latest Content

Front-End Frameworks for Banks and Financial Institutions: A 2026 Guide
Banks and financial institutions face front-end framework choices that affect application performance, security, regulatory compliance,…
July 15, 2026

10 Best JavaScript UI Component Libraries for Enterprise Apps in 2026 (Compared)
JavaScript libraries for UI component development in 2026 range from comprehensive enterprise frameworks that provide…
July 15, 2026

5 JavaScript Libraries Enterprise Teams Should Avoid Building From Scratch
Enterprise teams routinely invest substantial developer time building JavaScript libraries that already exist as mature,…
July 14, 2026


