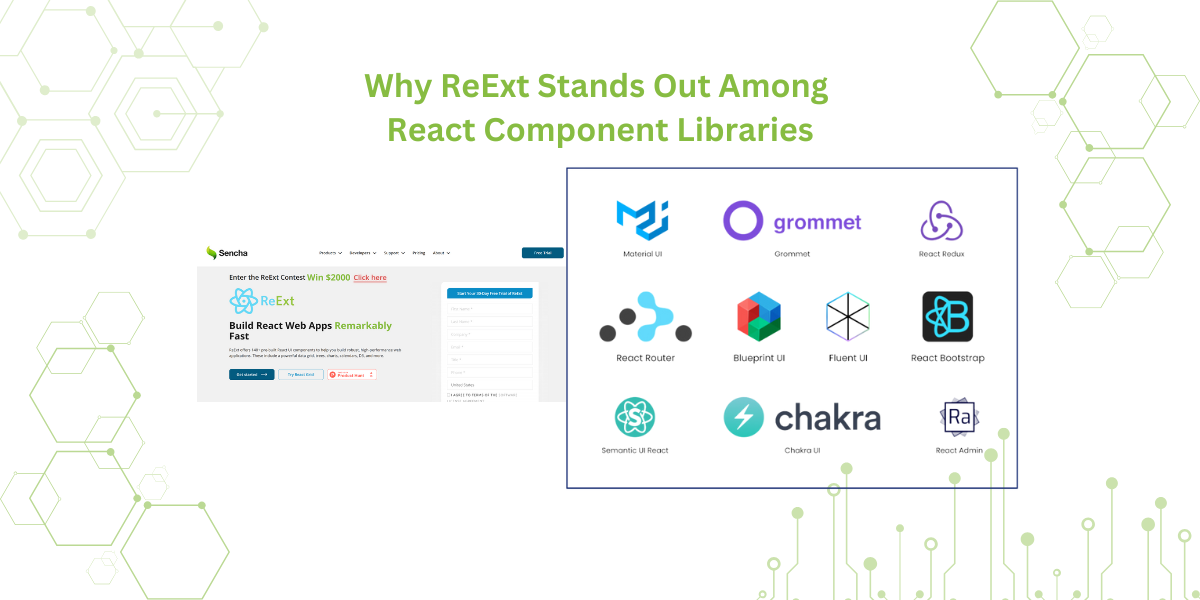
Introducing React ReExt – Sencha Ext JS Components in React! LEARN MORE

The Future Of Javascript App Testing Is Through Automation

May 13, 2021 124 Views
Show

As a developer, we understand how hard is to test all possible problems of an application, and always if you make an important change on your project you probably would be afraid if the application will be broken after merging your code to production, right? Not counting a lot of time you have to spend with many of tests, since basic and more complex to make sure that your new version will be running perfectly.

To solve this problem let’s learn more about Sencha WebTestIt which is a powerful tool that is totally free to use on your project and have great productivity saving time and avoiding big problems like bugs blowing up for the user. It can be helpful to use with many js frameworks.

How can I test Javascript Applications automatically?

As a first step, download and install the Sencha WebTestIt here. Follow the steps and you will receive an email with the link to download the product. Extract the file and install it on your machine simply following the very easy steps that the installer will show you. All steps to install are here.

Once you have Sencha WebTestIt installed, open it and click on New Project button and then give it a name like my-first-test.

Finally, you can define the language that you will create your tests. For this post, we will select Java. After that, click on the button Save to create the new project and start working on it.

You can learn more about the UI of the product here. It will explain each tab and what it is used for.

How easy is to to start a Simple Test Project?

For this project, we will be testing the Ext JS Admin Dashboard but running it locally and we will be focused on the Email page, the List component specifically that we created easily based on templates on this post. You can also test any Web Application or Web Site independently of the technology or framework used to create it.

How to create Objects with Sencha WebTestIt

Click on New Page Object File to store the element selectors to get the component references to access on our test and give it the name EmailListPo.java.

How can I simulate User Actions on a Test?

Here we are going to create the actions that our automated test will run against our Email List.

Let’s create an action to simulate the user clicking on the icon heart to remove the email from favorites and check if the cell on the grid was changed based on the cell red mark that Ext JS uses to identify if the value was changed on that cell then we will understand that the record was updated locally as a  non-favorite message.

Follow these steps:

  • Select the EmailListPo file from your project’s pageobjects folder.
  • On tab Elements click on Add element.
  • Give it the name iconHeart
  • On selector, type .x-grid-cell-inner .fa-heart referring to the heart icon in the grid cell
  • Click on close to save the selector
  • Drag iconHeart  into the Code tab after getTitle method to it create a new method with our new element.
  • It will open a context menu, click on Do then Click on element option
  • The UI will create automatically the method to simulate the click on the heart.
  • Save the file.

How can I write a Javascript test?

Let’s create the test that will use our actions created to then compare the result:

  • Right-click on folder tests
  • Click on New > Test file and give the name Test1.java for it
  • It will create the class Test1 with the structure and instructions on how to create your test.
  • On Step 1. Arrange of the instruction we will create an instance of our EmailListPo class and open the page of the Dashboard example.
  • For Step 2. Act of the instruction we will call the method to simulate the action click on the heart icon on the list.
  • On Step 3. Assert of the instruction we will compare the result if the heart clicked had the cell changed as a “dirty” record

Here is the final class:

// Sencha WebTestIt Test File

package uitest.tests;

import uitest.TestNgTestBase;
import uitest.pageobjects.*;

import org.openqa.selenium.WebDriver;
import org.testng.Assert;
import org.testng.annotations.Test;

import org.openqa.selenium.By;

class Test1 extends TestNgTestBase {
    @Test
    public void SampleTestCase() {
        WebDriver driver = getDriver();

        // 1. Arrange
        // Create a new Page Object instance by right-clicking into the code editor and
        // selecting "Instantiate Page Object" at the bottom of the context menu
        EmailListPo emailListPo = new EmailListPo(driver);
        emailListPo.open("http://localhost:1841/#email");

        // 2. Act
        // Call an existing action from your Page Object instance
        emailListPo.clickIconHeart();

        // 3. Assert
        // Use TestNG assertions to verify results.
        // e.g.:
        // Assert.assertEquals(title, "Test Automation for GUI Testing | Sencha");
        driver.findElement(By.cssSelector(".x-grid-dirty-cell")).isDisplayed();
    }
}

Executing the Test

Let’s run our test following these steps:

  • Click on the tab Execution and then Add endpoint.
  • We will be using chrome so let’s add the name Chrome (local) for it.
  • Click on Save endpoint to save and close the popup.
  • Now your tab Execution has a test. Click on Run all test files to see your tests running. Your REPORT will show all details about the test result with our test passed.

What is the next step for Javascript testing automation?

Try to change the example to force an error on the comparison and see it in action.

Now you can add tests for your application or website easily and don’t have to worry if changes on your project will break or not, it will keep the quality of your project.

Read here in detail how to create a simple test using Java, Phyton, or TypeScript. Also, learn here about Elements and Selectors to understand how to manipulate your application to reference on tests. Enjoy it!