

 Rapid Ext JS (beta)


Building a User Extension and Integrating It Into Sencha Architect 3 – Part 2
January 27, 2014
149 Views
Sencha Architect 3 allows users to create User Extensions that package useful third party libraries as reusable tools in all of their projects.
In Part 1 of this blog post series, Aaron Conran outlined a Car Query API and showed you how to build a useful component using Ext JS. The LinkedComboContainer he created will likely be valuable in many of your projects — a series of combo boxes that affect each other’s values is not a unique scenario.
In this post, we’ll walk you through the process of creating a reusable AUX (Architect User Extension) package. The components of an AUX are relatively simple. An AUX package is modeled after a Sencha Cmd package, and is compatible with Sencha Cmd. An AUX package has two extra pieces of information beyond a standard Sencha Cmd package. We’ll explain both of those in detail.
- The “architect” section of the package.json tells Architect how your class(es) should be loaded, and what CSS files may need to be loaded along with them.
- The “definitions” are bits of data that tell Sencha Architect how your class(es) should be presented in the toolbox.
Getting Started
Let’s get started by creating an empty package with Sencha Cmd. From your command shell, navigate to a Cmd workspace, and run “sencha generate package [packageName]” like so:
sencha generate package LinkedComboContainer
This will generate some output indicating the generation of the package. It will be placed in a “packages” directory under your workspace folder. The package name you used will define the folder name for that package.
For example: if you’re in a directory called /cmd-workspace/, the package will be placed under /cmd-workspace/packages/LinkedComboContainer
Let’s take a look now at the contents of a package, specifically as it pertains to Architect. The most interesting parts (those that are Architect specific, and that we’ll need to modify in this example) are highlighted in bold. For simpler readability, we’ve left out two folders that are generated (overrides, sass) since we will not need them in this particular AUX.
architect/            # JSON definition files for each of the AUX classes
        Xx.Definition.js  # Definition file for the XX.Definition class
build.xml             # Generated file that controls how the AUX is built
docs/
        package.png       # Graphic used on Sencha Market for this AUX
        screenshots/
                pict.png      # Graphic used for Sencha Market
licenses/             # License agreement for this AUX
                Readme.md
package.json          #
Readme.md             # Description of this AUX used on Sencha Market
resources/            # Static resources used in this AUX
                css/          # CSS resources for this AUX
                images/       # Files for images used in this AUX
src/                  # Javascript source files for each extension class
        xxxx.js
        yyyy.js
You can see looking at this structure that there are three tasks ahead:
- Add our code to the src/ folder.
- Edit the package.json to let Architect know about that code.
- Create a Definition file and place it in the architect/ folder.
Step 1 — Adding your external source code to the package:
The first step is simple. We’ll download the code from the example in Part 1.
Now, just place it in the src/ folder of our generated package. It will be located here: src/LinkedComboContainer.js
That’s it. If you have more files, you can place them in the src folder as well. If you’ve got a lot of files you prefer to keep organized, subfolders are fine. You’ll just need to specify them in the package.json, which we’ll cover next.
Step 2 — Editing the package.json:
The package.json file is used by both Sencha Architect and Sencha Cmd to understand the contents of this package. Here’s what an unedited package.json looks like:
“name”: “LinkedComboContainer”,
“type”: “code”,
“creator”: “anonymous”,
“summary”: “Short summary”,
“detailedDescription”: “Long description of package”,
“version”: “1.0.0”,
“compatVersion”: “1.0.0”,
“format”: “1”,
“local”: true,
“requires”: [] }
You’ll want to put your name in the “creator” field, as well as add a summary and a detailed description for your package in their respective fields.
The “version” field can be left at 1.0.0 for now. If you release a new version of this package, you’ll want to update that value.
The “compatVersion” is not used by Architect at this time, though Sencha Cmd does use it to ensure that if you install an upgraded package, your project won’t need to be adjusted due to API changes. You can read more under the “Package Versioning” section of the Sencha Cmd Packages guide here.
Next, you’ll need to add an “architect”: {} object to your package.json. It’ll look like this:
“compatFrameworks”: [
“ext42”
],
“classes”: [{
“definition”: “LinkedComboContainer.Definition.js”,
“className”: “Ext.ux.LinkedComboContainer”,
“js”: [
“LinkedComboContainer.js”
],
“css”: [
] }] },
Let’s look at this piece by piece:
“compatFrameworks” is simply an array of strings indicating what framework(s) this code will work in. In our case, it was only built and tested for Ext JS 4.2, so we’ll list “ext42”. If you built an extension for Sencha Touch 2.2 and 2.3, for example, you’d list [ “touch22”, “touch23” ].
“classes” is an array of objects, where each object defines one of your classes. Let’s examine the components of each of those objects:
“definition”: “LinkedComboContainer.Definition.js”,
“className”: “Ext.ux.LinkedComboContainer”,
“js”: [
“LinkedComboContainer.js”
],
“css”: [
] }
Details of the class object:
“definition”: There will always be a 1:1 correlation between definitions and classes/components you want the user to be able to drag out of the toolbox. The value here is simply the filename of the definition file, placed in the architect/ folder. In this case, “LinkedComboContainer.Definition.js” — which we’ll author shortly.
“className”: This should match the className that we’re loading. You’ll recall that the class created in Part 1 is defined using: Ext.define(‘Ext.ux.LinkedComboContainer’, { … }); — we simply place that className here. Note that Architect will always start looking in the “src” folder, so that doesn’t need to be specified. However, had we put the file in a subfolder, e.g. “src/lib”, the entry would read “lib/LinkedComboContainer.js”
“js”: This is an array of JavaScript files which creates the class that will reside in the src/ folder of our package. For this case, we’ll just need one file — “LinkedComboContainer.js”. However, if LinkedComboContainer.js required another bit of code we created, e.g. “SpecialComboContainer.js”, to be loaded first, we’d list both files in order of dependency, like so: [“SpecialComboContainer.js”,”LinkedComboContainer.js”]
“css”: In this particular instance, we don’t have any special CSS. However, you may create a component that has special styles associated with it. Listing one or more files here will cause them to be loaded if/when you drag out this component.
If our example had additional classes, we’d simply have an object for each one, separated by commas, just as you’d expect in JSON.
Writing a definition:
Definitions are the magic that brings your code into Architect. There’s not much to writing the simplest of definitions, but developers can perform some pretty involved tasks with definitions if they choose to. Here’s an example definition for our LinkedComboContainer, which I’ll break down piece by piece:
“classAlias”: “widget.linkedcombocontainer”,
“className”: “Ext.ux.LinkedComboContainer”,
“inherits”: “Ext.container.Container”,
“autoName”: “MyLinkedComboContainer”,
“helpText”: “A linked combo container”,
“toolbox”: {
“name”: “Linked Combo Container”,
“category”: “Form Fields”,
“groups”: [“Forms”]
},
“configs”: [{
“name”:”disclosureMode”,
“type”:”string”,
“initialValue”:”enable”
},{
“name”:”loadMode”,
“type”:”string”,
“initialValue”:”ondemand”
},{
“name”:”listeners”,
“type”:”object”,
“initialValue”:null
}]
}
The required fields here are:
className: this should match the className
classAlias: this should match the alias of the class you created in your custom code
autoName: this is the base name given to instances of your class — the name given to a component that the user drags out of Architect.
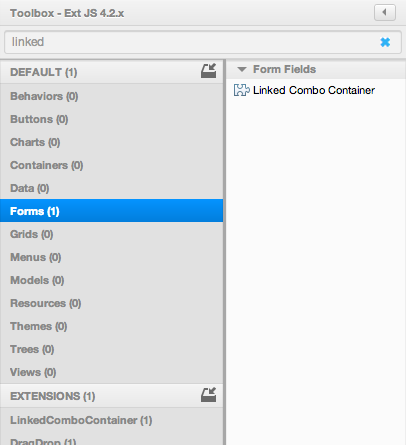
toolbox: {} — this object tells Architect what the name of the component should be when displayed in the toolbox, and what categories/groups to place it in. The “group” is the pane at the left of the toolbox, in this case the component is placed under “forms”. The “category” indicates which section on the right pane the component is placed in (as shown below).
Some optional items we’re using in this definition:
inherits: if your component extends or inherits from another, it’s useful to specify this here. Configs that Architect already exposes for that component will be automatically pulled in. This will save you a considerable amount of work, making your component easily configurable. In our case, we’re extending “Ext.Container”, so we’re going to specify inherits: “Ext.Container”. This is different from actual class inheritance — Architect merely uses it to inherit behavior such as exposing configs.
helpText: this text will show up when the mouse is hovered over the (?) icon in the toolbox. Use it to give the user some details on what this component is. This is especially useful in extensions that contain many different components that might require a bit of explanation.
configs: all components in Ext JS and Sencha Touch have “configs” — values that the component uses as configuration options ranging from simple strings to complex objects. In this case, our component needs a few special configs beyond those that a ComboBox already provides. You can expose configs in an AUX by specifying their name, type and initial value in the definition as we did above.
While we haven’t covered everything you can do within a definition, this is enough to get our project going. For further details, please see Creating App Templates and User Extensions in our documentation.
Putting it all together
Now that we’ve created our package.json and our definition and put the files in the right place, and barring any typing mistakes, we’ve got a working package.
The next step is to make sure the package loads, so we’ll need to copy it where Architect can find and load it. As mentioned earlier, AUX files are ZIP archives for the purposes of easy distribution. However, Architect stores installed extensions in the directory specified in your Sencha Architect preferences (Sencha Architect -> Preferences).
Each package is placed in a directory like so:
%ExtensionDir%/{extensionName}/{version}
So, if we create a folder called LinkedComboComponent, and a subfolder called 1.0.0, we can copy our files in and Architect will load it right up for testing.
Note: Be sure that the “.sencha” folder gets copied over. On Linux / OSX systems, the “cp” command may not bring over hidden folders, but this is required for Architect and Cmd to load them.
If you’re looking to get started quickly, here’s the relevant folder in our github repository for the LinkedComboContainer extension.
A few pointers for editing and debugging your extension:
First and foremost: when saving a project that uses any components of a user extension, the package is copied into the project since it’s needed for deployment. This means that subsequent edits from the %ExtensionDir% folder won’t automatically make it into the project. Instead, it may be easiest to edit directly from the packages folder inside the saved project while debugging and tweaking the extension until it’s ready for release.
If definitions aren’t being loaded into the toolbox, check the Log pane at the bottom for error messages. More than likely, it’s a typo in the definition (e.g. a missing comma), or a missing field that is required.
Finally, if you’re struggling and need a bit of help, please check out our brand new forum for Sencha Architect User Extensions and Templates.
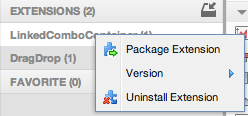
Packaging your extension:
Once an extension is working and ready for public distribution, packaging it is a breeze. Simply right click the item in the toolbox under “Extensions”, and choose “Package Extension.” Choose a location to save the file, click “save” and that’s all there is to it.
Installing a packaged extension:
It’s extremely easy to install an AUX file. Simply click the “Install User Extensions” icon in the toolbox, or click File -> Install User Extension and navigate to the file.
To try it out, download the extension created in this post.
We hope you’ve found this to be a useful introduction to developing User Extensions for Sencha Architect, and we’re looking forward to all of the great things the Sencha developer community comes up with. Keep an eye on the User Extensions section of the Sencha Marketplace for more useful extensions that will help speed up your development process.
What's your reaction?
 0
0

 0
0

Latest Content

Ext JS Performance Optimization for Large-scale Applications
Are you facing issues with Ext JS applications’ performance as they scale up? Don’t worry!…
April 23, 2024
Ext JS Dynamic Forms: Hands-On Guide to Create Data Forms
Dynamic forms are changing the online world these days. ExtJS can help you integrate such…
April 23, 2024

How to Write Unit Tests with Sencha Test
In modern software development, unit testing has become an essential practice to ensure the quality…
April 22, 2024


